30+ magical upcycling projects to make with the kids
Fun craft projects to create with the family

Staring down the barrel of a long summer holiday or looking for new creative ways to fill your weekends and after school time? Fear not: we’ve compiled a list of fun projects that you can make with your kids that will spark their imagination and keep small hands occupied. Whether you're after a big holiday project or a rainy day activity, from garden ideas to games and home decorations, click or scroll on because we've got it covered...
Bug hotel
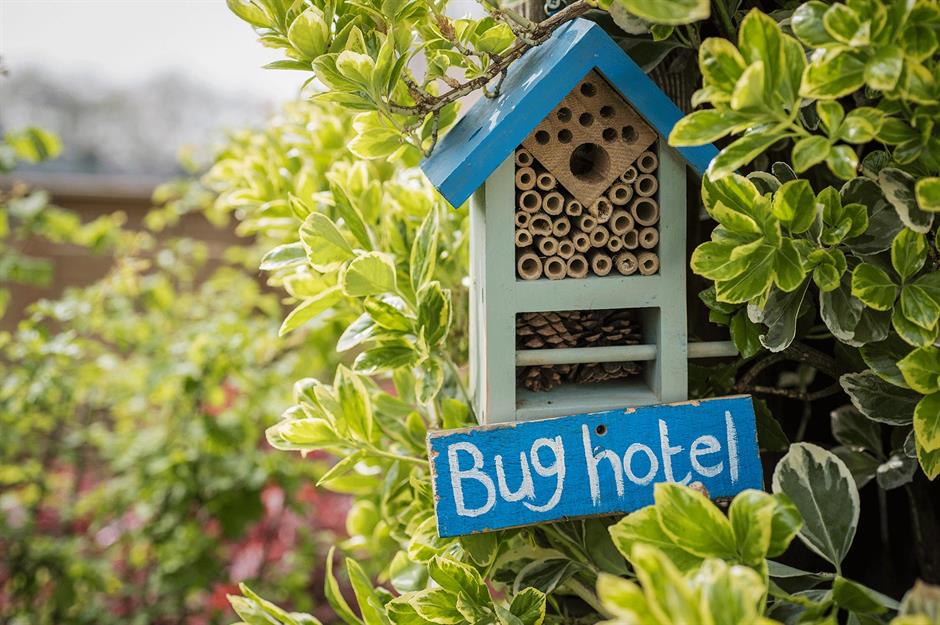
Keep your little darlings – and all the mess – out of the house and in the garden by enlisting them to help build a bug hotel using all the random bits of wood and any old bricks leftover from an old build project you can find. If you don't have any, ask your neighbours – they will thank you for helping them get rid. This one from the RSPB is sure to attract some garden guests. Finally, the copious amount of sticks and pinecones that have made their way home from the park will come in handy.
Crayons reimagined

What parent doesn’t have lots of half-chewed, broken crayons lying around the place or clogging up the bottom of the craft box? That’s what makes this idea from Local Anchor ingenius: get rid of crayon debris by creating new playthings.The best part of this activity is letting little ones smash up all the crayons (a great way to get your children to stop fighting). Once in little pieces, put the crayons in muffin tins or shaped oven-safe silicon moulds and put in the oven for 15-20 minutes. Et voila! You have brand new crayons for free.
Sponsored Content
T-shirt bracelets

This upcycling idea from Hello Glow is a lovely project to undertake with slightly older children (they may even offload on you while they are nice and chilled). It's also a great way of using up clothes and fabrics that are way past their best, which might otherwise end up as landfill. All you need is some rattail cord, some glue, magnets (this is how the bracelet will close) and some old clothing you're happy to have cut into strips for braiding. The brighter the better!
Tie-dye clothes
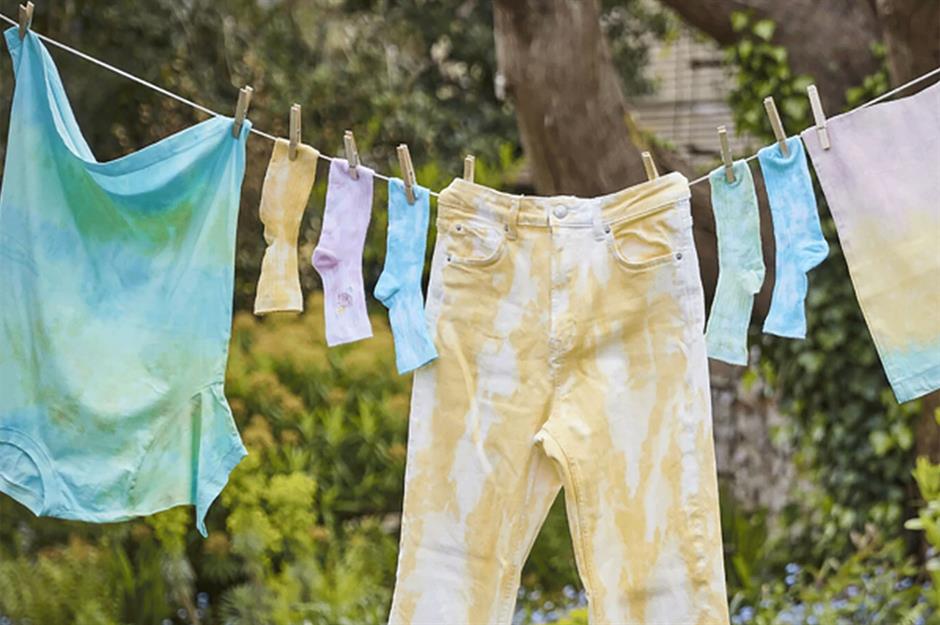
Another way to upcycle old clothes – but this time ones that still have a good deal of life in them – is to turn them into something new. Tie-dye is a surefire way of giving new life to old outfits and just requires some clothes dye (stick with one colour if you like or choose colours you think go well together), some elastic bands and some rubber gloves. Children are always delighted by the swift transformation as it only takes a couple of hours to see the results.
Toilet roll unicorns
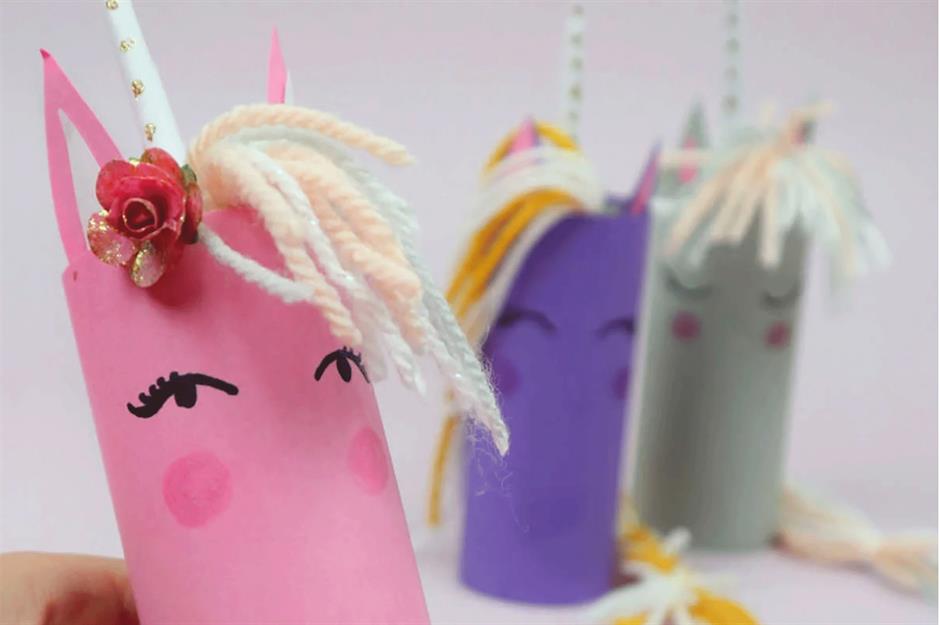
If there’s one thing every household has, it’s empty toilet rolls. And there's nothing more rewarding than turning a throwaway functional item into something pretty like these unicorn figures from Craftsy Hacks.You'll need either coloured paper or card to wrap around them, or you could use paint. Then it's a case of getting creative with wool for your unicorn's hair and tail, rolled paper for a horn, and any other bright/shiny things you can find to decorate it.
Sponsored Content
Easter egg crates
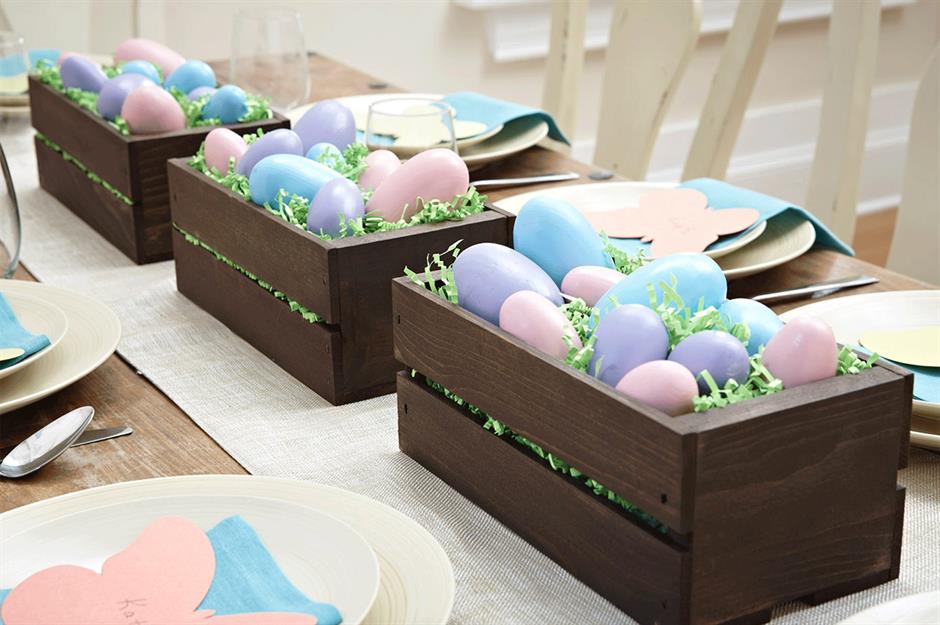
Next Easter, don’t rely on the Easter Bunny to bring all the magic, make some of your own by turning old wooden crates into jolly table decorations for inside or outside as per this DIY idea from Rusto-leum, with brightly sprayed wooden eggs bringing the Easter cheer. Be sure to work outside to avoid breathing in any fumes from the wood stain and spray paint, and to limit the mess, too.
Nature bookmarks

How about creating something that nurtures two things that are so vital to children's development – reading and nature? These sweet bookmarks from Craftsy Hacks are a great way of engaging with your child as you decide which bird (or other animal) you want to use before settling down to draw them. You don't need too many materials – have a rummage around your craft box and you may find a jumbo paperclip or two – and the felt scraps can be replaced with coloured card.
Egg carton flower wreath
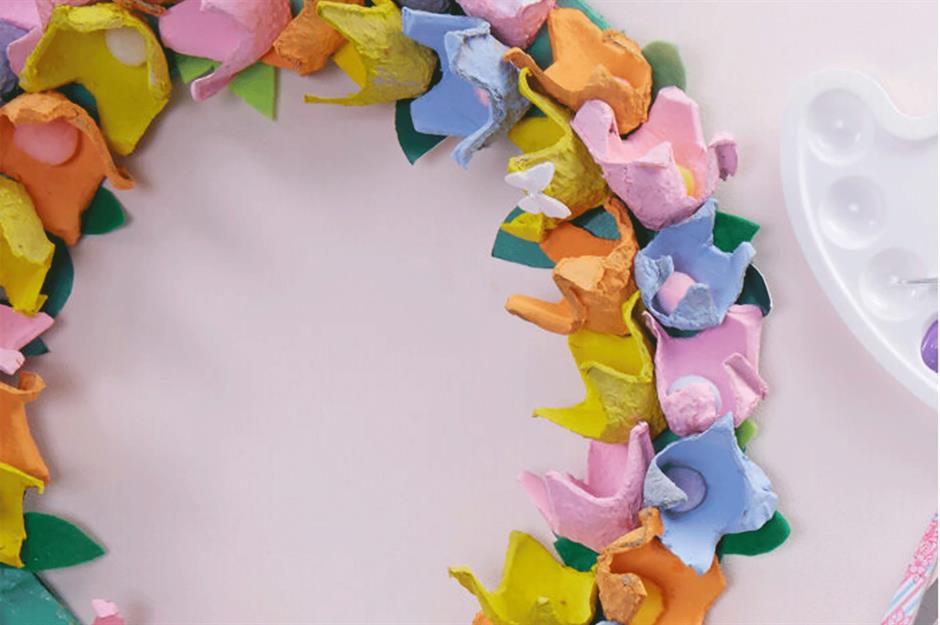
Another idea that uses up the packaging of a household staple is this gorgeous flower wreath. Hobbycraft suggests using a foam base, but we're sure card could work too. Then you need to assemble lots of egg cartons (you might want to pre-plan this a little and save up some boxes or ask friends for their leftover ones) and do the fun bit: paint them all sorts of beautiful and vibrant colours. Once dry, stick them onto your base, decorate with felt and pompoms – or whatever you have – and there you have it!
Sponsored Content
Seashell windchimes
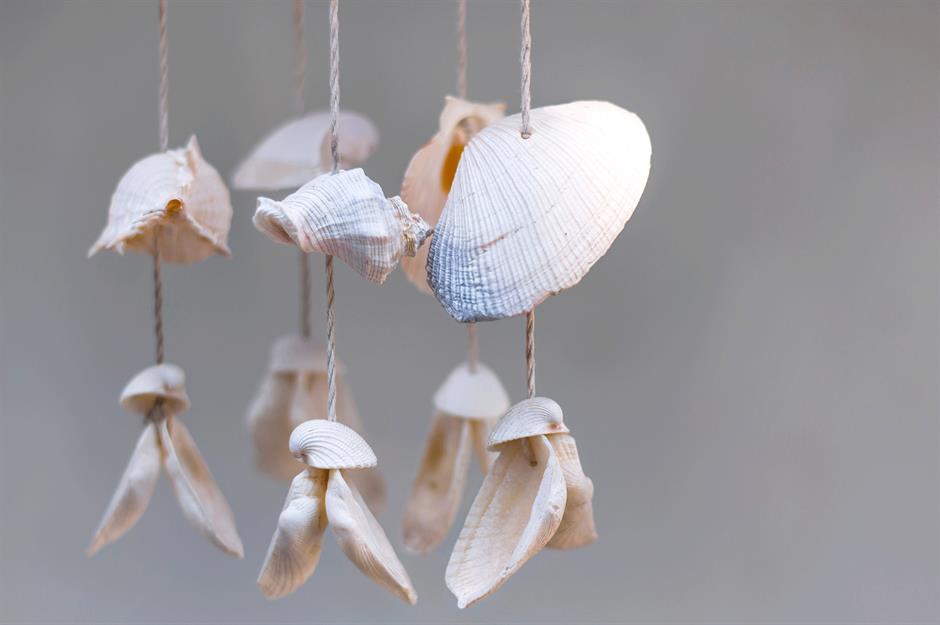
Everyone loves a windchime, so why not make your own using all those shells your little ones have gathered from various beach days but have never found a use for? You can even do like Artsy Chicks Rule does and add beads to your creation. You'll need some kind of base from which all the shells can hang – which could be an embroidery hoop, the base of an old planter, or a large shell – some string or wire and a drill. Once finished, hang in your bathroom or a nice tranquil spot in your garden.
Fantasy fairy garden

Looking for ways to bring a little magic into your home for kids? Breathe new life into an unused terracotta pot or old fruit bowl by transforming it into a fairy garden that will ignite their imaginations. After painting, fill the pot with stones and compost, then add moss, pebbles and twigs. Now this is the magical part! Choose accessories like fairy doors and mini figurines and set up little scenes among the greenery. You never know, this could be the beginning of a new green-fingered hobby.
Octopus puppet
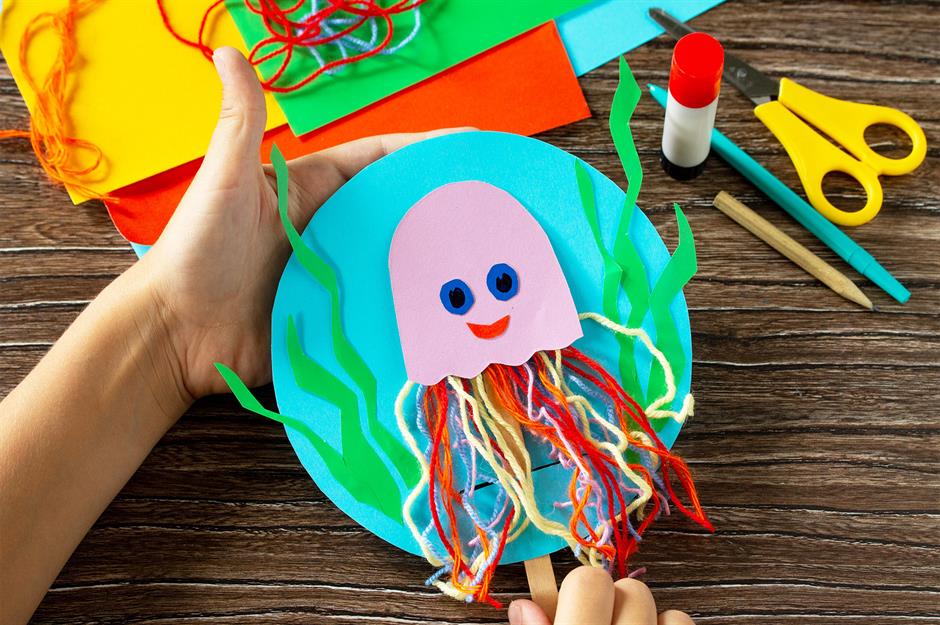
Dreaming of the beach? This cute puppet is easy to create and will provide hours of entertainment. Start with a circle of card and cut a slit ready to add your puppet. Decorate your ‘sea’ circle with paper seaweed and some fish if you wish. For the puppet, cut and stick an octopus shape to a lolly stick and add yarn ‘legs’ to the back. Decorate with a cute face and start the show!
Sponsored Content
Space doodle pillowcase
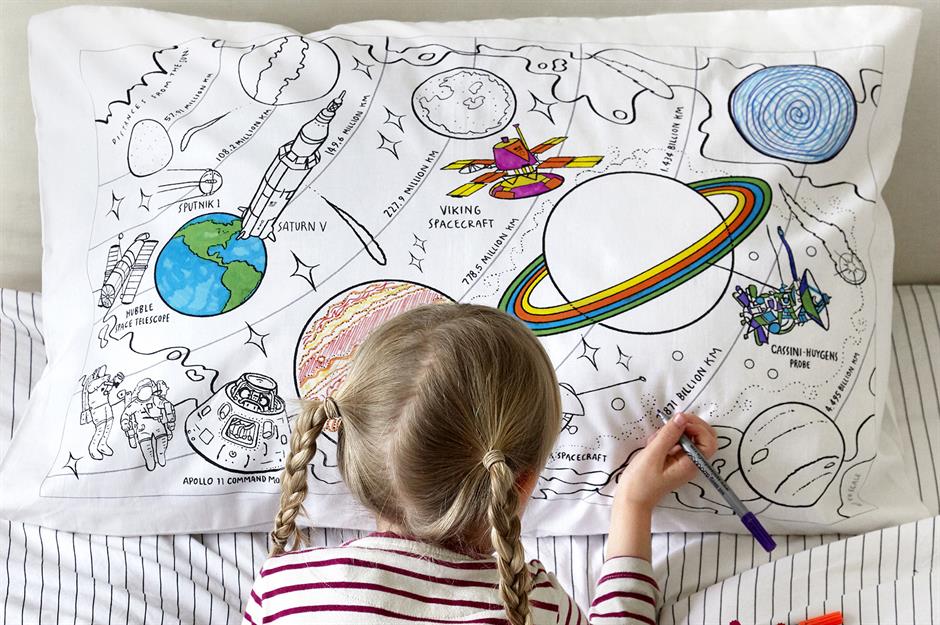
This idea from eatsleepdoodle is quite literally out of this world! If your little one loves nothing more than getting creative with a pack of colouring pens, this fun colour-in pillowcase is the ideal project. It comes with a set of 10 wash-out fabric pens then, when they just fancy a new look, wash the pillowcase in the machine, and it‘s ready to go again. You could also use the pens to upcycle any other plain fabric items that could do with jazzing up – think old T-shirts, tote bags or trainers.
Plastic bottle cat planters
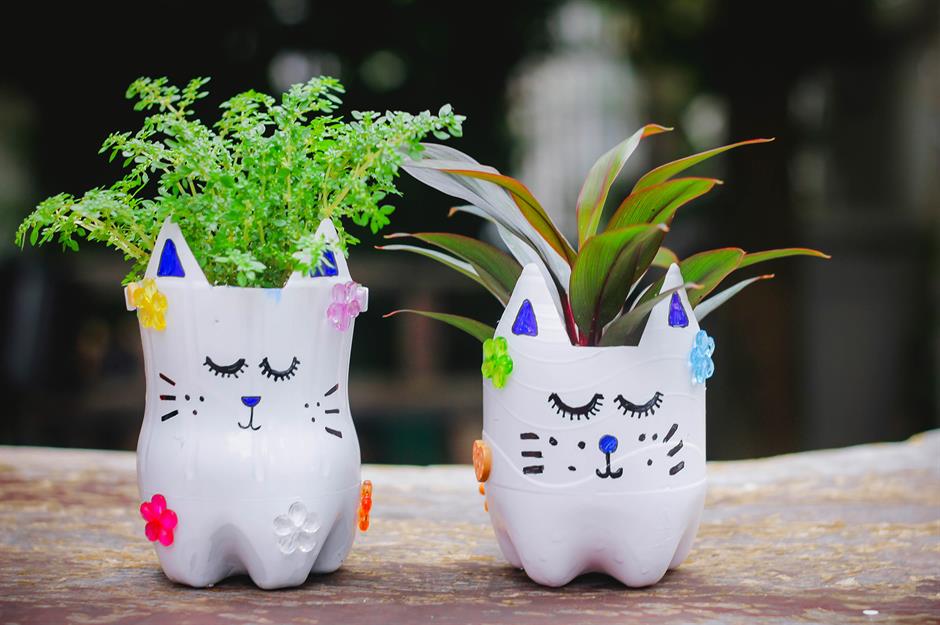
Turn drinks bottles into sweet little planters with this easy project. To make, cut the bottom third of an empty two-litre bottle, including two triangle points for the ears. Add some drainage holes in the base. Spray paint the bottle in your desired colour and, once dry, draw on a face and whiskers with a permanent pen. For extra decoration, add gems and other embellishments. To complete, fill the bottle with soil and pop in a plant. These are sure to add some cheer to a small garden or balcony space.
Tin can bowling
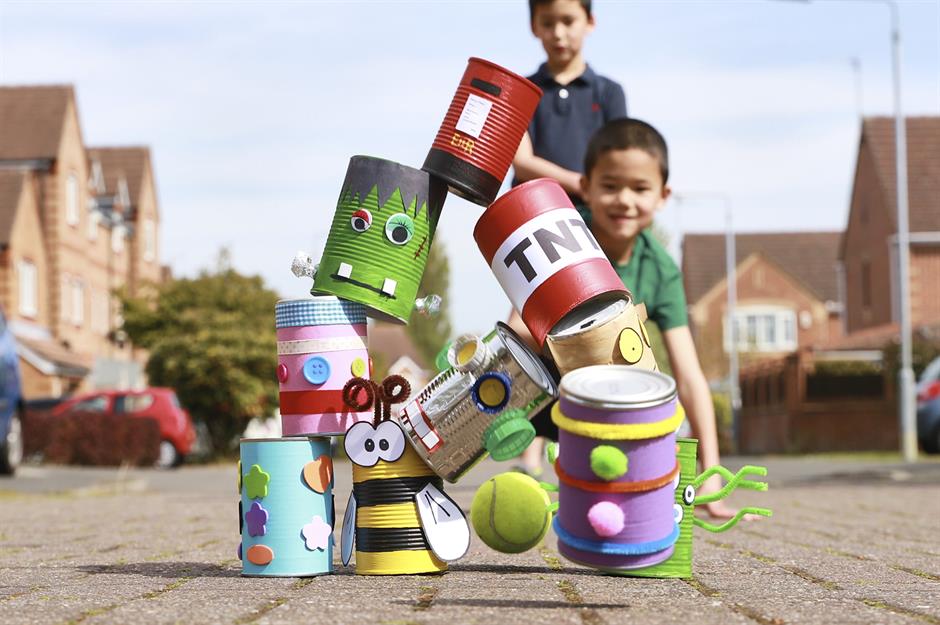
Looking for a fun new game? Recycle tin cans by turning them into a bowling set. After washing, decorate the outside of 10 cans with paint, paper and other crafty bits, being careful of any sharp edges. Once dry, take them outside and stack them up. Take it in turns rolling a tennis ball at them. Decide how many goes you want everyone to have, (depending on how long you want the game to last). If you’ve got space, this one can be played indoors, too.
Sponsored Content
Felt hearts
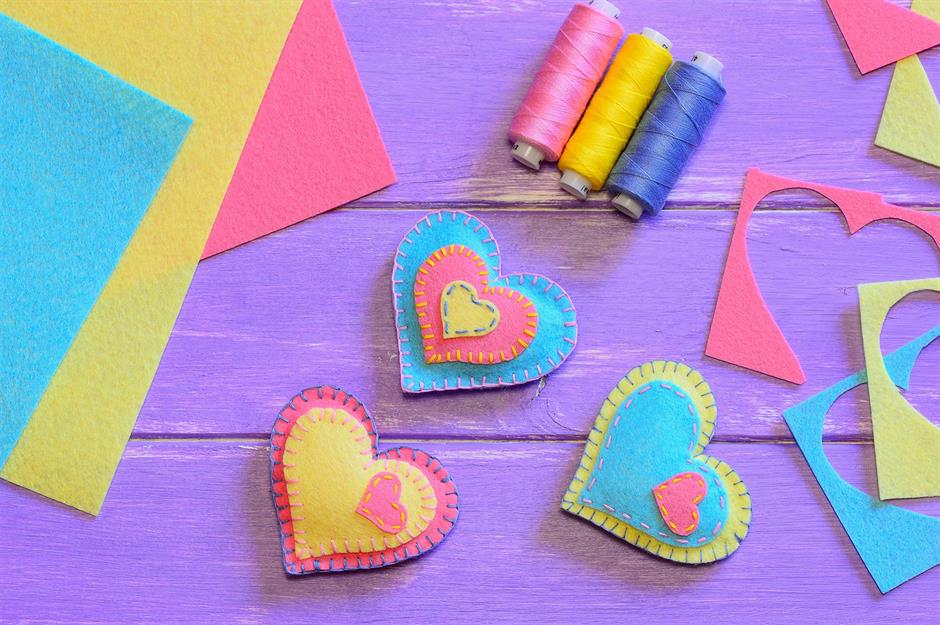
These felt heart decorations are perfect for using up offcuts of felt. You can get heart templates online or make you own. Start by cutting out two of the same sized hearts for the main part of the design. Then cut smaller shapes for the front. Attach the decorations using a blanket or running stitch, then sew the front and back of the heart together with a blanket stitch. Leave a gap, add toy stuffing and continue stitching. You could sew on a loop of ribbon and use to hang from doors and drawers. Cute!
Textured wall art
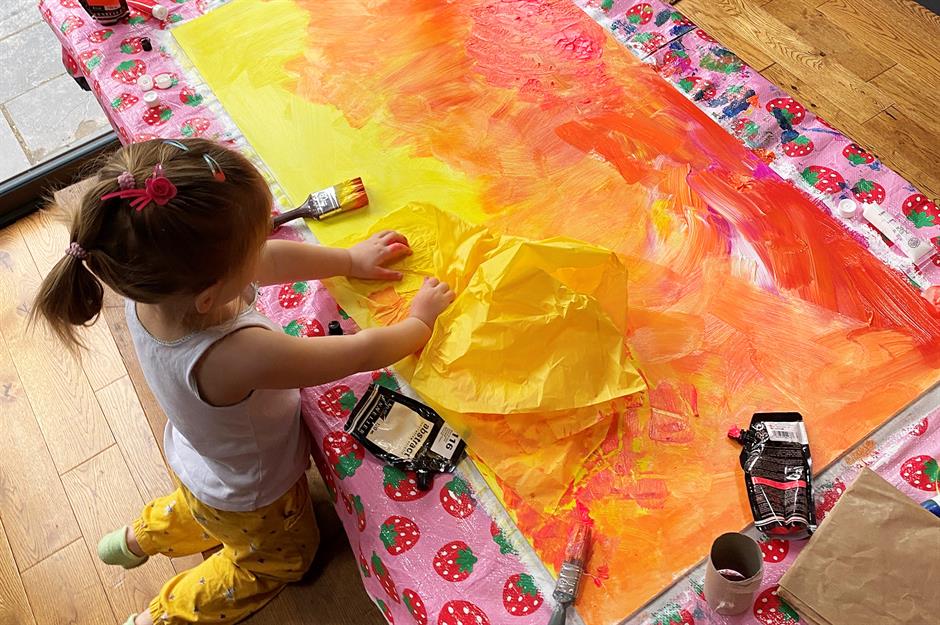
What do you get if you combine a sheet of MDF with white primer paint, acrylic paints, balloons, scrunched up tissue paper and bubble wrap? The answer? Textured original wall art! DIY-loving dad @alexdodman let his daughter have free rein with the art supplies to create memory-making art to adorn his hallway, and the results are art gallery-worthy.
Stone monsters
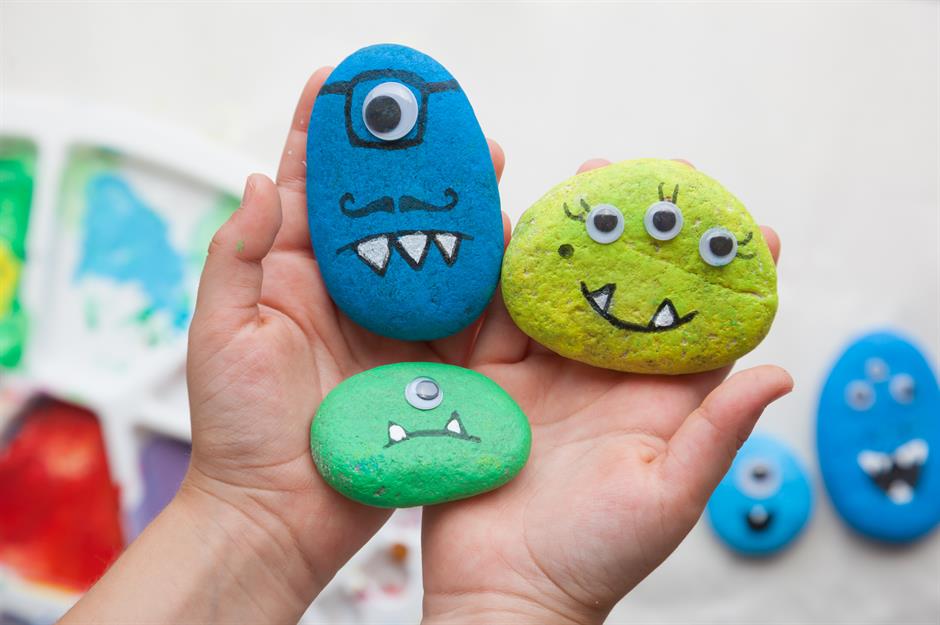
Keep little monsters busy when out on walks by setting a task of hunting out smooth stones to turn into fun rock creatures. Once you've got your stones home, give them a wash and allow them to dry. Then the kids can get involved in painting them in bright colours. Once the base colours are dry, add monster faces and googly eyes, to give them bags of personality.
Sponsored Content
Faux marble storage tins

How cool are these faux marble tins? A great DIY project by Pillar Box Blue, this is a stylish way to revamp those old biscuit tins gathering dust in the cupboard and all you need is some nail varnishes and spray paint. First, create a clean base by spraying the tins in a block colour, then add drops of nail varnish to a container of warm water. Swirl with a cocktail stick, then gently roll your tin over the surface of the water. Add more varnish and repeat with the lid and allow to dry. You could even add a couple of different colours. They make fab gifts or bedroom accessories for tweens and teens.
Paper chain rainbow wall hanging
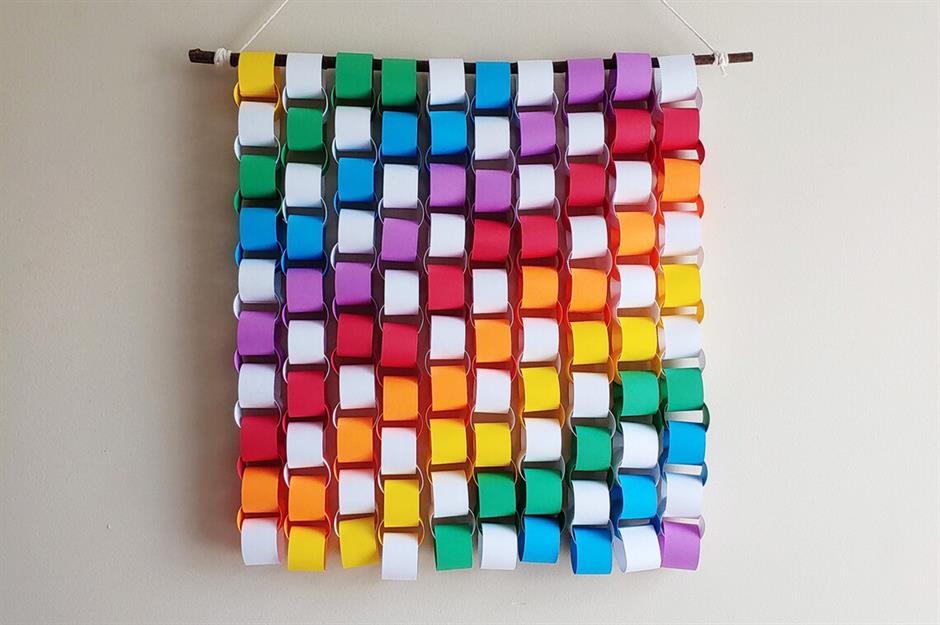
Rainbows are symbols of inclusivity, and this easy make is a fun afternoon project to do with little ones. Cut eight A4 sheets of coloured paper into thin strips and apply double-sided tape to one end; you'll need between 40 to 50 of each colour. Then create chains mixing the colours however you want or pick up a readymade kit by RainbowChainsDIY at Etsy. To finish, slide the strands onto a piece of dowel or any suitable stick and add a string for hanging. It's just the thing to add some colour to a plain wall.
Cork memo board

Get your child's homework area in order with a handcrafted memo board, crafted from six squares of customised cork. Start by spraying a piece of corkboard with magnetic chalkboard paint. Take your second and third pieces and paint in colours of your choice. Wrap two lengths of string around the fourth, add a paper pocket to the fifth and cover the last in fabric. Once all your boards are done, lay them face down, before taping them together and mounting the six squares onto a cardboard backing to give it extra strength. Cut some string and secure it with tape, then add mini pegs for clipping on notes and photos. Organisation awaits!
Sponsored Content
Dinky doll's bed
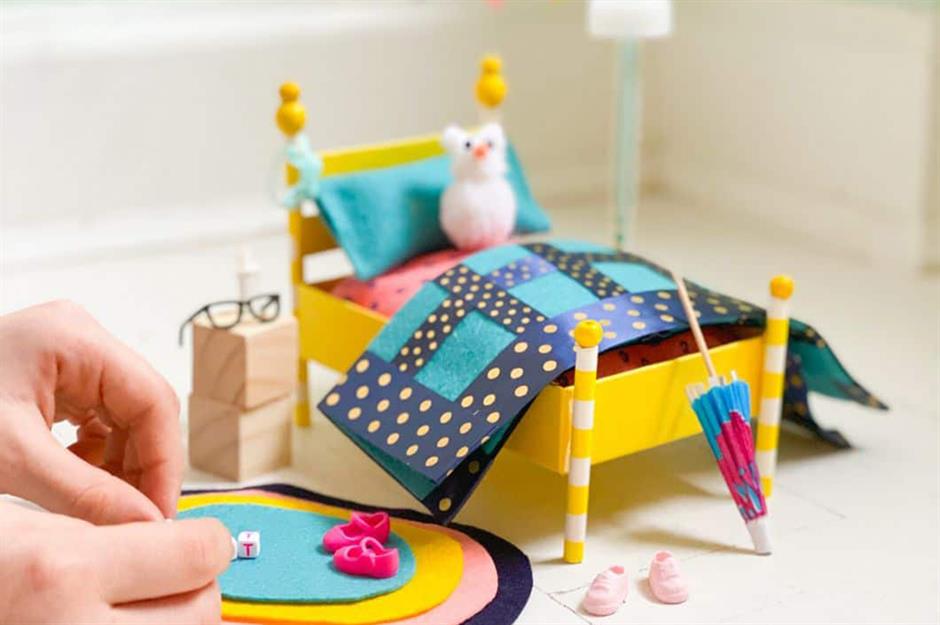
With just a small box and some paper straws, your little one could create some new furniture for their doll’s house. The addition of beaded bedposts takes this miniature bed to another level and it's super squishy thanks to a mattress fashioned from cotton wool balls covered in fabric. Accessorise with a mini patchwork quilt. You can find the full tutorial on the Project Kid blog.
Role-play station
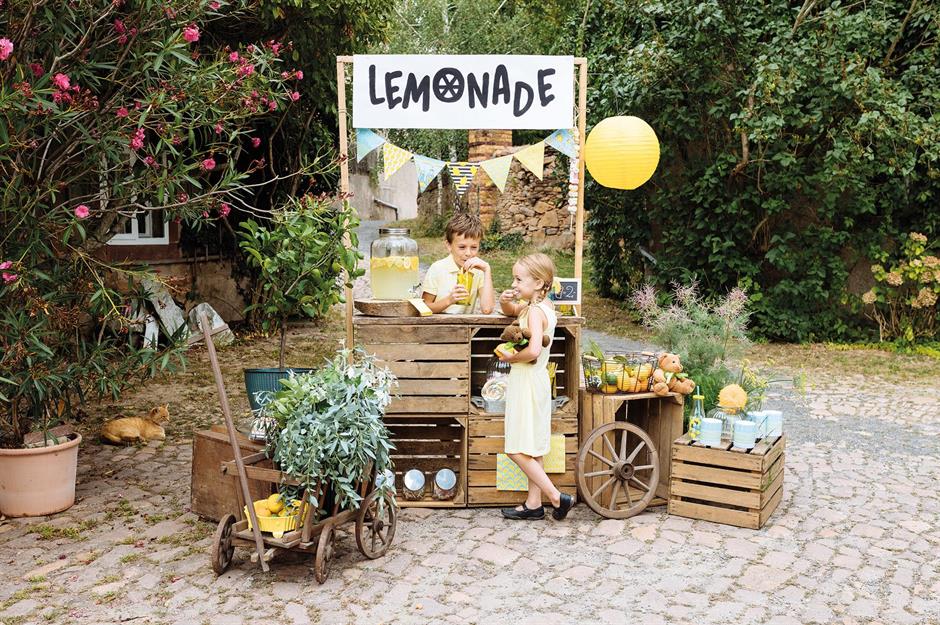
A role-play station like a lemonade stand or their very own market stall will provide hours of fun. This one is made from four crates and an overhead sign put together from off-cuts of wood by competent adults using screws, a drill and wood glue. When the main structure is sturdy, get little creatives involved in the process by dressing the station in fabric, paper bunting and by fashioning cute signage. Then all you need are the props!
Butterfly decorations
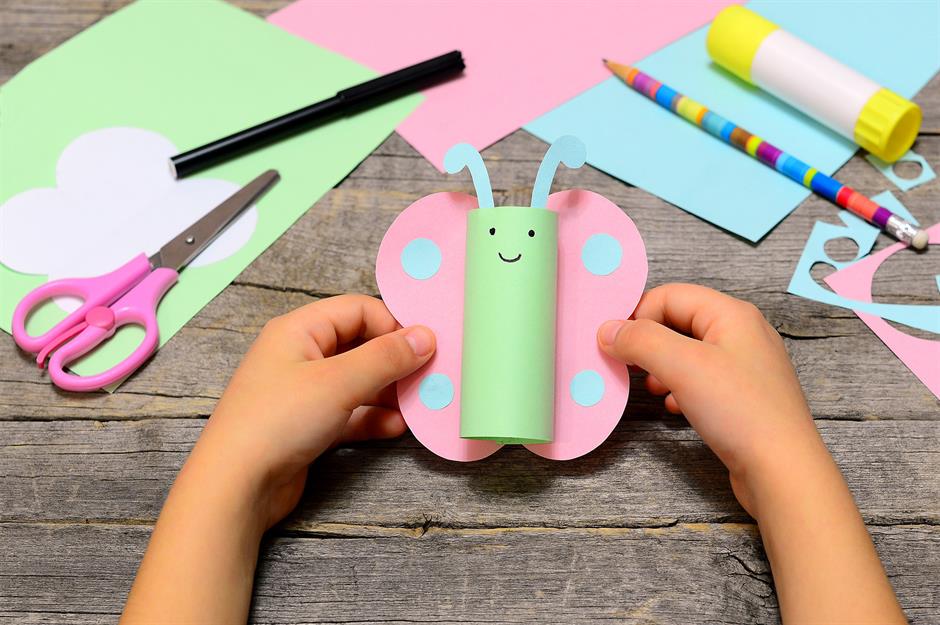
Another great upcycling project for little hands that uses up those empty toilet rolls. Give them a hand by creating a template for the butterfly wings, then let them get artistic with the poster paints before sticking on the wings and antennae. Why not add some string and hang from a window? Beautiful!
Sponsored Content
Marker pen ceramics
Kids love to have their own stuff, so make sure they know which plate is theirs with this fun project from Hester’s Handmade Home. All you need is some plain ceramic plates or bowls and Sizzix permanent marker pens. The kids can write their own names or go for this cool Memphis-style artwork. Once complete, let your serving plate and bowls dry for at least an hour and place in a cold oven. Switch the oven on to 175°C (350°F) and once it's been reached, set your alarm for 30 minutes. After this time, switch the oven off, open the oven door slightly and let the ceramics cool down. You can repeat this baking process to fully ‘cure’ your design.
Rainbow bench
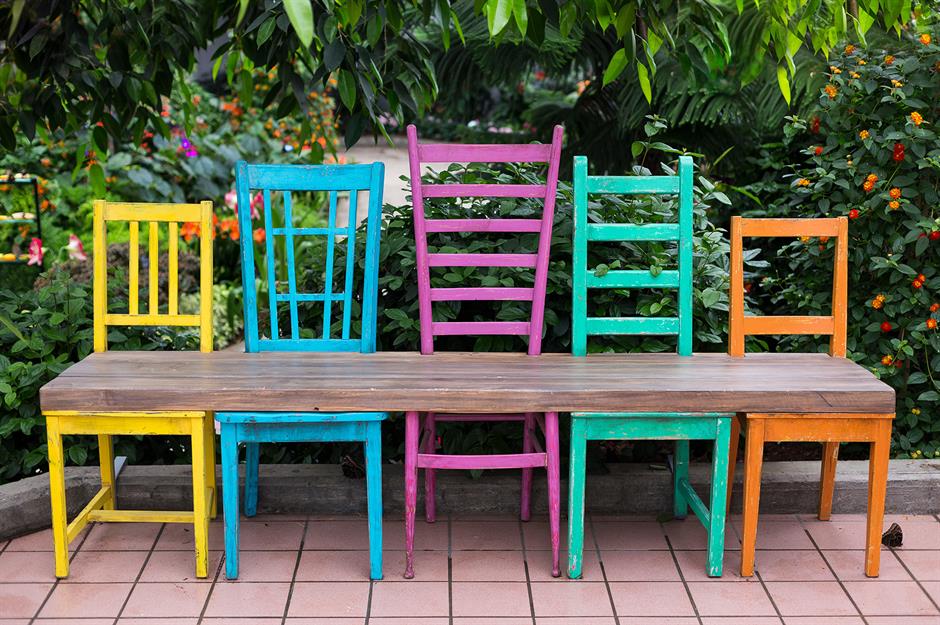
We do love upcycling furniture, and what's better for the summer than a rainbow garden bench? If you've got some unloved dining chairs, this is a fun way to give them a new purpose in the garden. The kids can paint a chair each in their favourite shade of garden furniture paint, then once dry, butt them close together (you can even tie them or use cable ties to secure) and an adult can attach a length of wood cut to size to form the benchtop. It's perfect for brightening up a shady spot for family gatherings in the garden.
Cardboard castle den
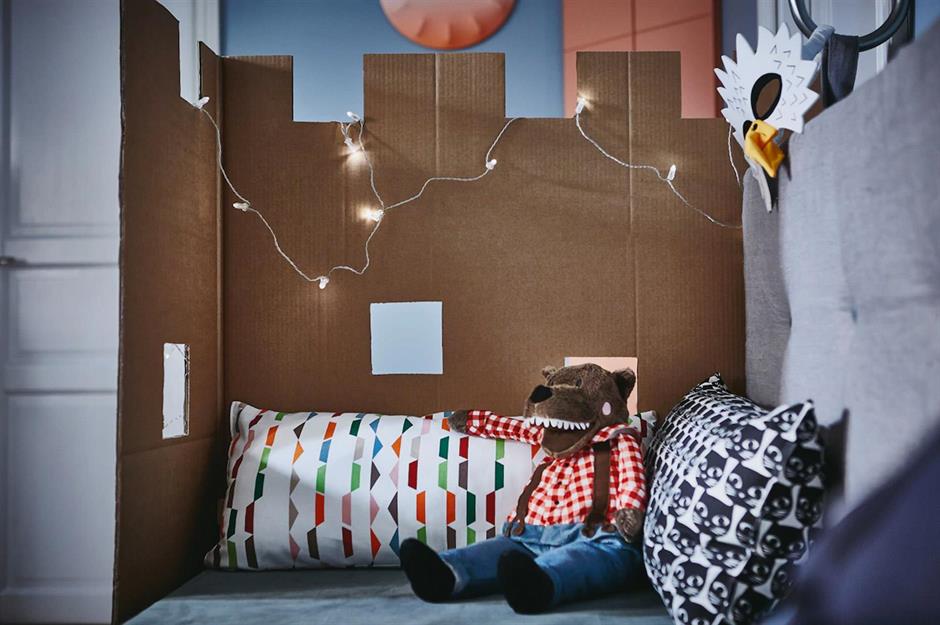
Turn an empty cardboard box into a foldable fort, complete with cut-out windows and turrets that any little prince or princess will love to escape to. This is a super-easy idea and zero-budget make that they will want to get involved in making. You could customise it further by painting on brickwork and other details. Complete the scene with twinkling LED fairy lights and comfy cushions.
Sponsored Content
Pom-pom edge rug
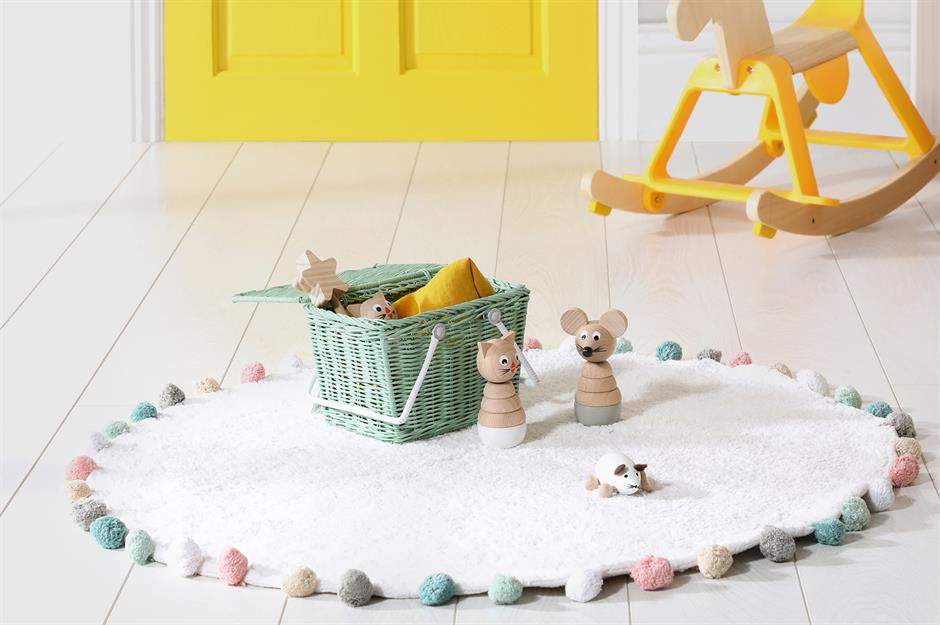
Pom-pom making, that childhood fave, is super easy; you can use a gadget, or why not try the age-old cardboard rings or fork methods? An enjoyable rainy day crafternoon activity; gather your yarn and get winding, many hands make light work. When you've made enough pom-poms – you'll need about 40 for this make – trim and fluff them up. Then stitch them to the edge of a rug for a fashionable update to a kid's bedroom or playroom.
Pallet signpost
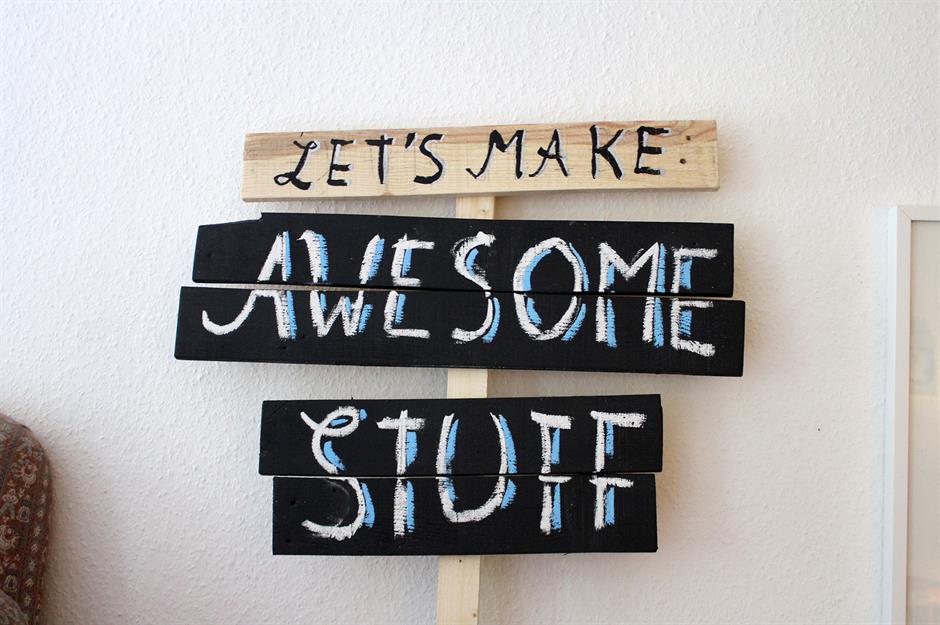
Just the thing to display in the craft room or play den, this nifty sign is made from pallet wood. Once you’ve cut it to size and nailed the sections in place, it’s time to get arty. Here, the top has been left plain, and the bottom two sections have been painted with chalk paint, so the message can change when you fancy mixing it up. Why not get the kids to practise their best handwriting in chalk?
Painted toy crates
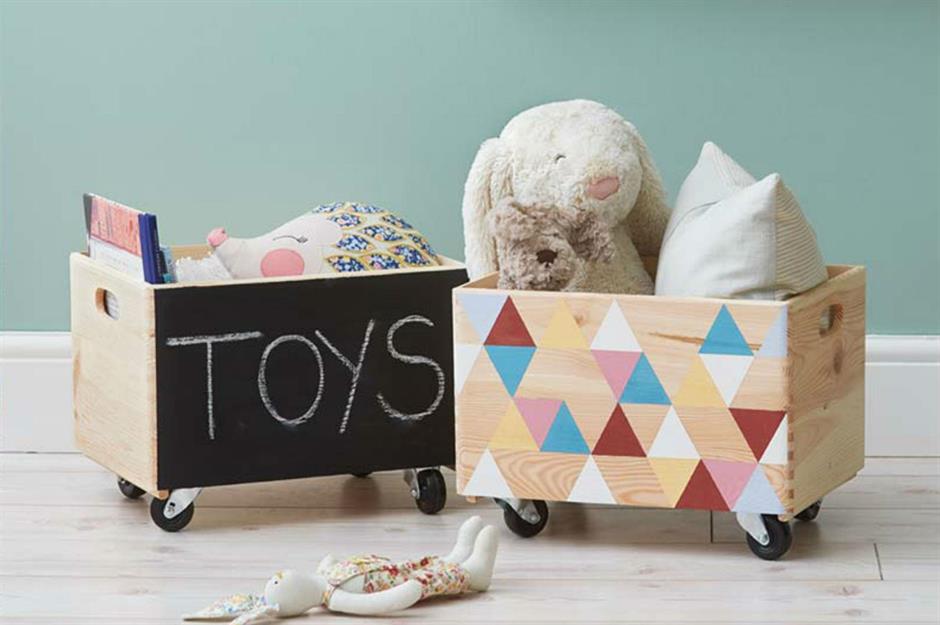
Get creative with kids' storage by painting the sides of plain toy crates with chalkboard paint or help younger ones to experiment with a geometric pattern. Simply mark out triangles with painter’s tape and fill in with chalk paint, allowing any adjoining triangles to dry before painting the next. Add casters for the perfect wheelable storage. You never know, it may even encourage them to keep their rooms tidy.
Sponsored Content
Drinks carton flowerpots
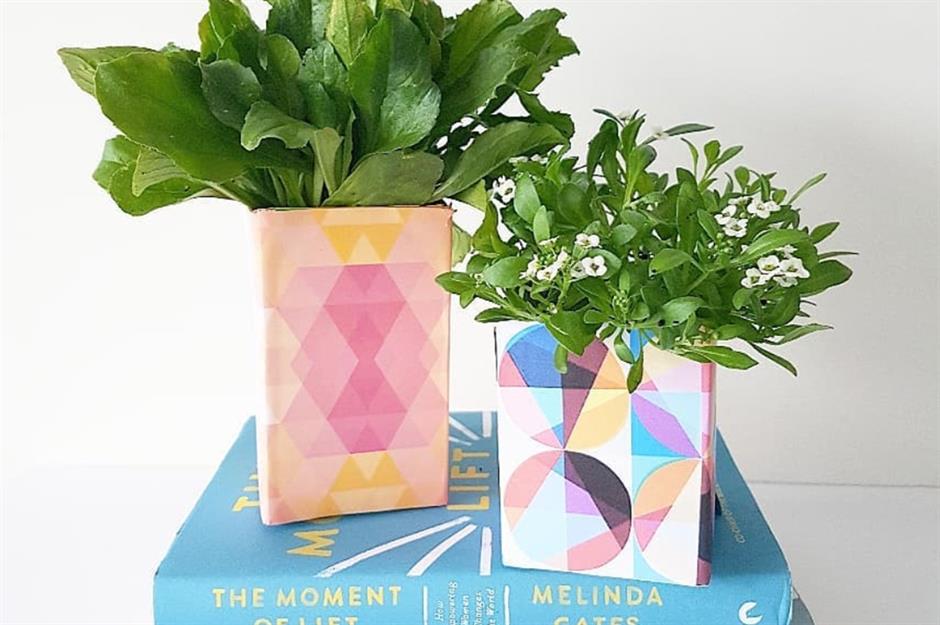
Don’t throw away those milk, cream or juice cartons; they make great no-cost flowerpots. As @cintaandco demonstrates, with the addition of some colourful paper they can be transformed into jazzy planters. They are really easy to create, simply cut the top off the cartons, cover with printed paper and place small pot plants into the cartons.
Flower power birdhouse
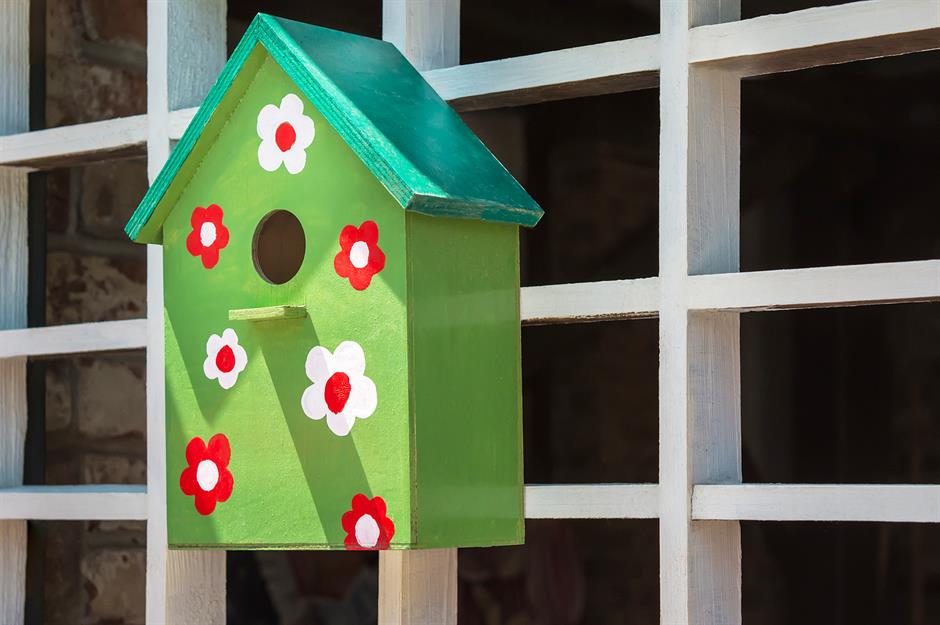
If you want to encourage a love of nature in your young ones, a birdhouse is an enjoyable little project. You can buy them in kit form, that you can assemble or for a quicker win, there are paint-your-own sets that include a set of paints. Why not get the kids a kit each and let them unleash their creativity, painting anything from flowers to spots? Mount on a fence post or wall, to utilise a small garden space. Then sit back and wait for all the garden birds to arrive.
Cork mushroom decoration
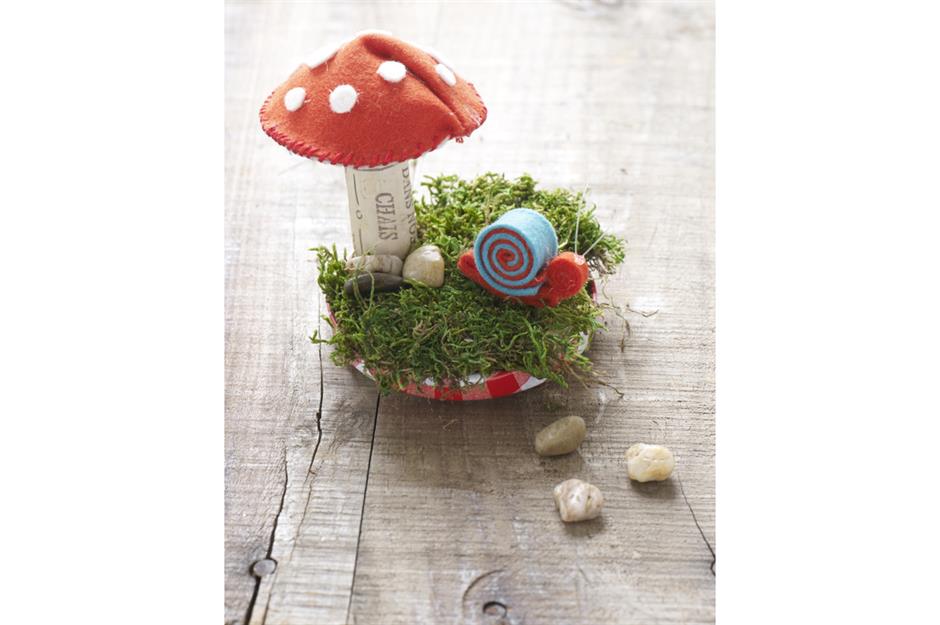
If you’ve amassed a collection of wine corks, this is a cute project to make with the kids. Here, blogger Project Kid has upcycled materials to make this little mushroom and snail vignette. To make the mushroom cap, cut a 3.5-inch diameter circle from red felt and a 3-inch diameter circle from white felt. Pinch the red felt so that the edge of the circle overlaps slightly on itself and glue in place. Start stitching the circles. After you have sewn about halfway, stuff cotton balls inside and continue stitching. Add small spots. Glue to your cork and add to the lid. Cover the lid with moss and make a snail from small coils of felt to complete. Adorable!
Sponsored Content
Fairy light planet
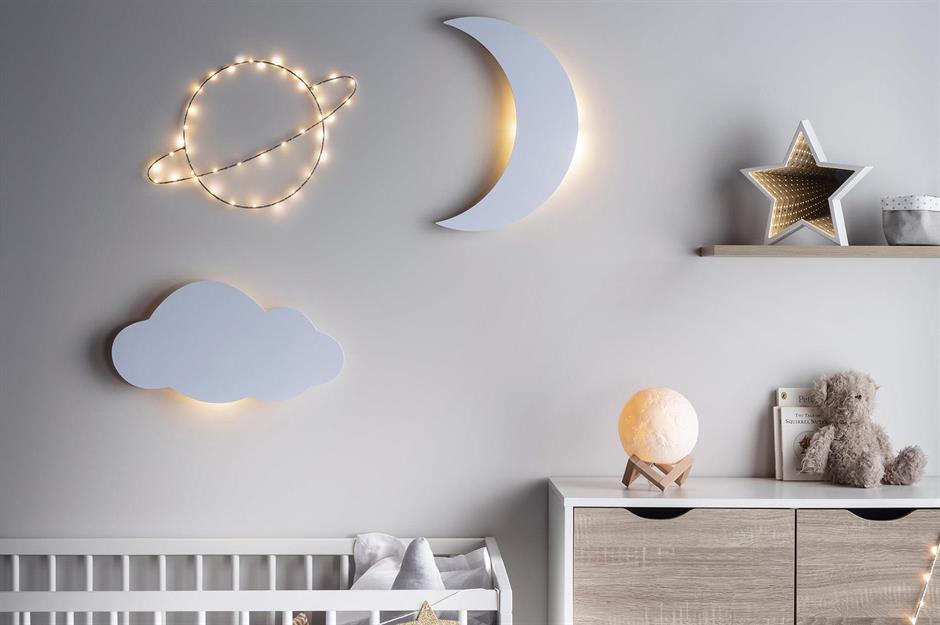
Recreate the night sky and create a cosy bedroom by wrapping micro fairy lights around a metal frame. A coat hanger is good for this, as you can bend it into any shape you wish. Start by cutting off the hook part with wire cutters, then bend into shape, and be careful to tuck in any sharp ends. Simply wrap the frame with fairy lights to create some original lighting for the home; the kids can get involved in this part. Add to your twinkling scene with moon and cloud lights.
Felt ice lollies
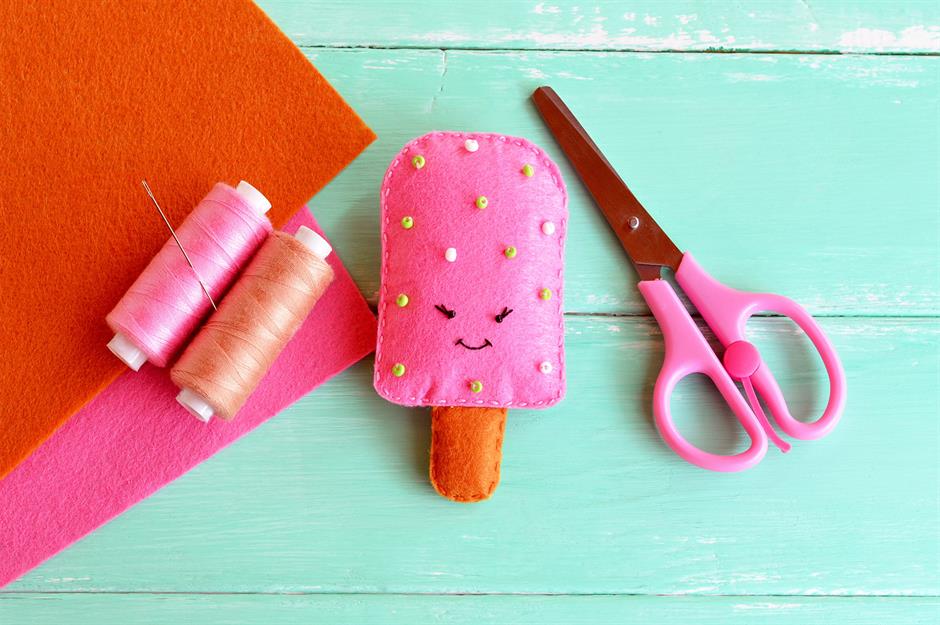
Perfect for some summer holiday crafting, this sweet felt ice lolly is sure to go down a treat with creative kids. Start by making a template for your lolly pieces, then cut out from different coloured felt, two for each section. Use a running stitch to sew the lolly stick first and add some toy stuffing. Add beads and a face to one side of the lolly, if you wish. Then stitch together the lolly, stuffing with filler as before. Join the two sections together, and enjoy!
Loved this? Follow us on Facebook for more DIY hacks and creative ideas.