Stunning motorhome makeovers: before and after
The best fixer-upper projects on wheels
Recreational vehicles and campervans are the modern nomad's best friend and the perfect way to experience life on the road without sacrificing creature comforts. But, these stylish RVs don't often start out that way and lucky for us, the internet is awash with innovative vehicle conversions and reveals that make us want to downsize.
Step inside and take a look at these gorgeous motorhome makeovers and renovation ideas that are sure to ignite your imagination. Click or scroll on to take to the open road...
Homestead farmhouse-style RV: exterior

It's hard to tell from the outside if this is a delightful tiny home complete with a terrace or a motorhome. Believe us, it is an incredible RV stationed on the owners' farm and all dressed up for Halloween.
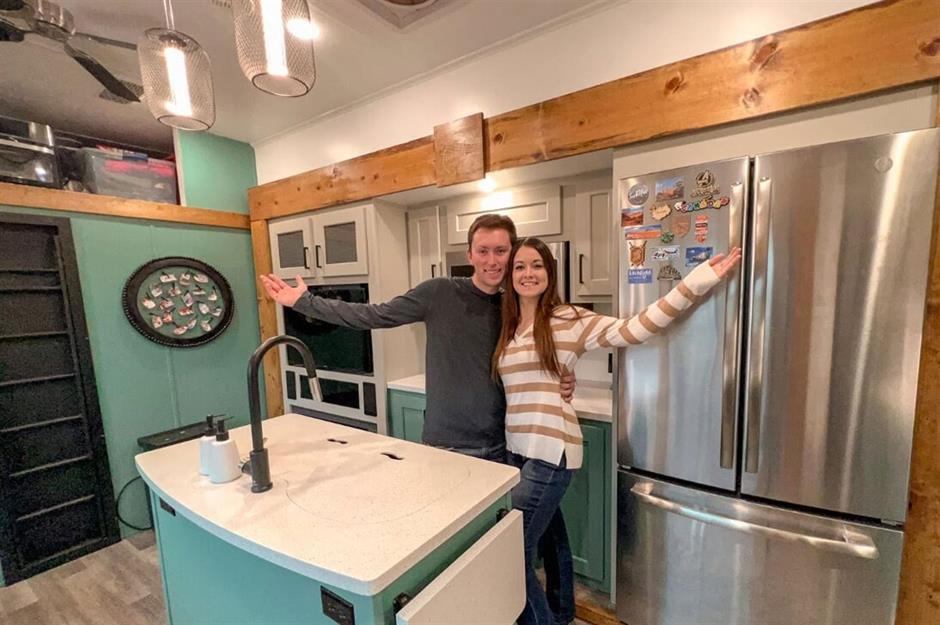
The huge homestead RV belongs to Lacey Sullivan and her family who have transformed their camper into a space that you wouldn't believe was once a typical motorhome. Lacey documents her tiny living life renovating her homestead in South Carolina on her Instagram page @laceyautumnbrooke.
Homestead farmhouse-style RV: before

The before shots are the only remaining proof that this RV once had a typical "all-brown" and dowdy outdated RV interior lacking character and personality.
"I remember the day we moved in. It was pouring with rain–we had no bed for ourselves so we slept on the living room floor while the boys took the bedrooms. It was a little scary and a little exciting...but mostly scary. We worked HARD to get here and I'm so glad we did," explains Lacey on her Instagram feed.
Sponsored Content
Homestead farmhouse-style RV: after

It's evident the family did indeed work hard! Fresh white walls, warm neutral tones and natural materials replace every trace of dowdy brown.
One of Lacey's favourite customisations in the living space is the handy herb shelf. Installing the shelf high is a practical idea to make use of every inch of space and being able to have glass storage on display is one benefit to living in a stationary camper.
Homestead farmhouse-style RV: after
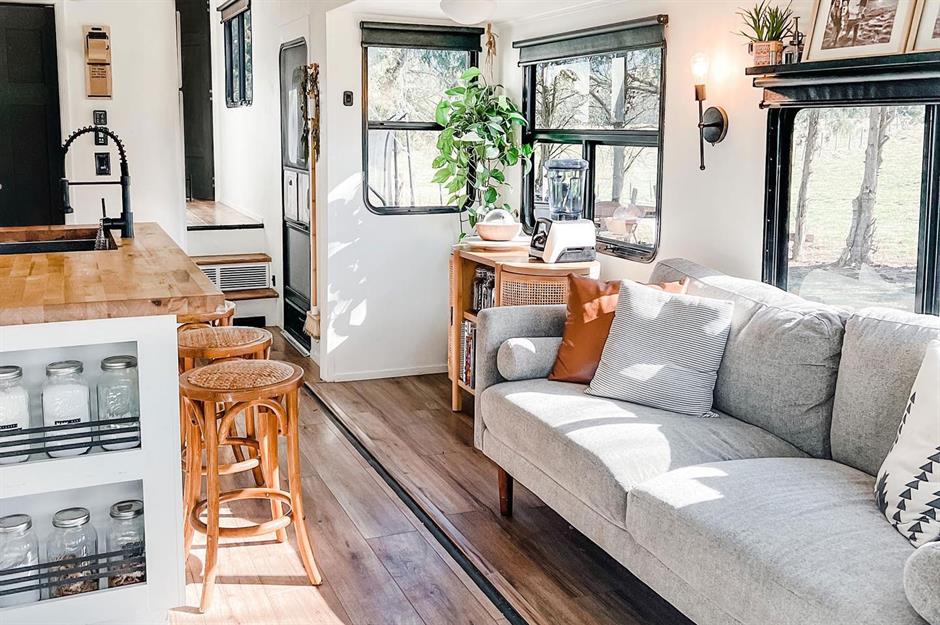
Drab and dated leather couches have been replaced with twin contemporary fabric sofas. Clever considerations such as choosing seating with legs enhances the sense of space and is a smart idea for tiny living.
Home comforts including a kitchen island and stand-alone sideboard look the part in this motorhome as they would in any other 'usual' home. Lacey prides herself on having the best of both worlds.
Homestead farmhouse-style RV: after
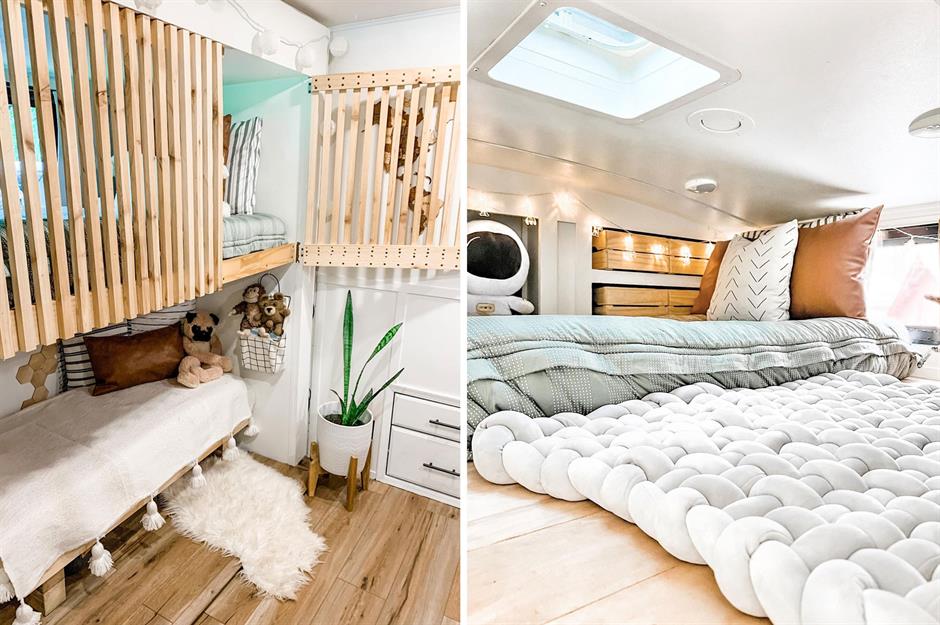
Making the tiny home practical, homely and fun for their children is a priority for Lacey. Another benefit to living in an RV is how easy it is to change living arrangements. As the children have grown, the couple were able to switch bedrooms to suit.
The current master bedroom feels open and airy with built-in storage shelves. A bright and oversized comforter hides storage under the bed.
Sponsored Content
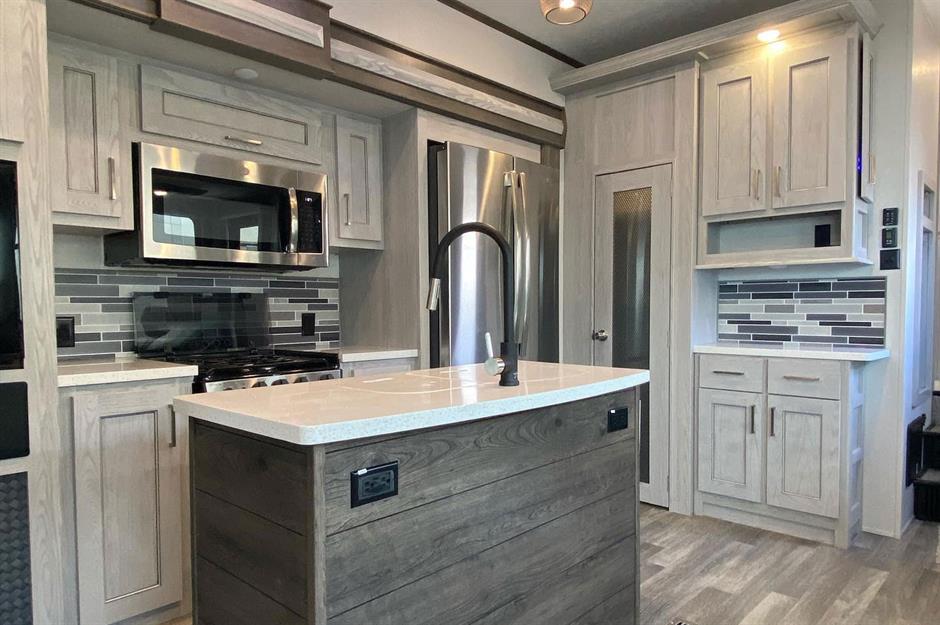
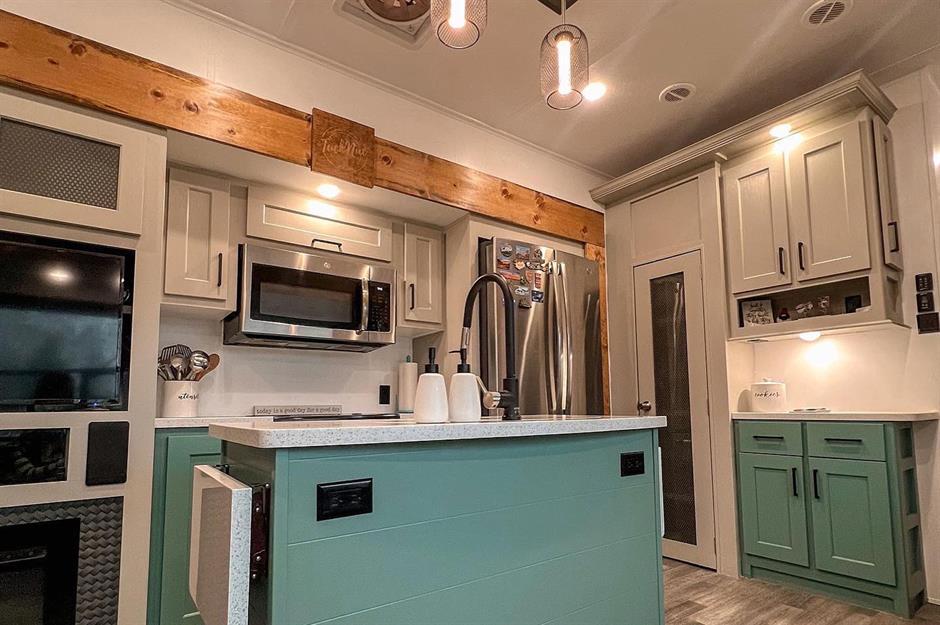
Budget-friendly Keystone Montana: exterior
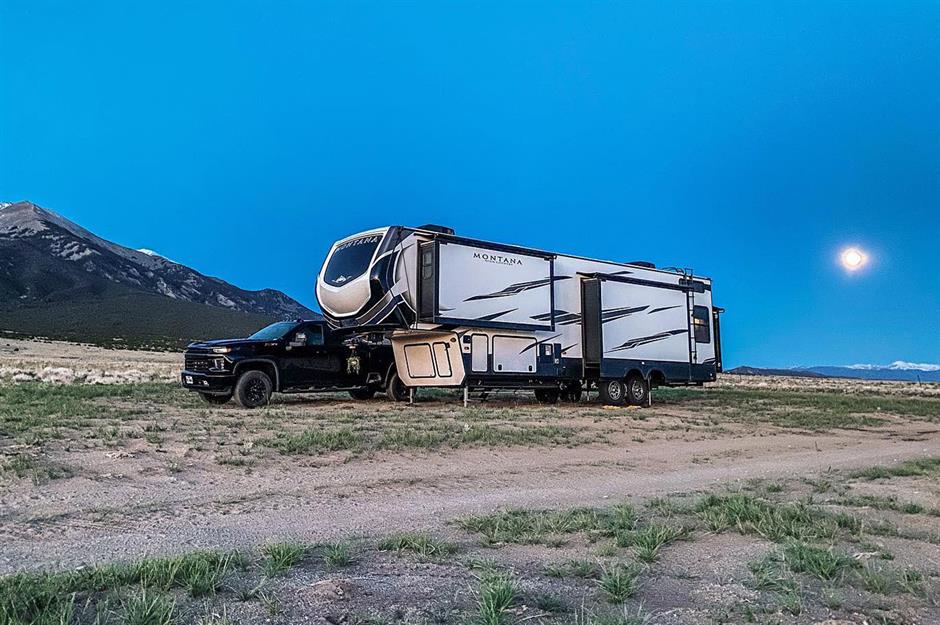
Janae and Tucker McCormick are an adventure-loving couple who travel the US in their Keystone Montana Fifth Wheel.
As well as running an RV-inspired blog, Adventures With Tucknae, and collecting an online following of over 30,000 fellow travellers, the pair are slowly renovating their home from home.
Budget-friendly Keystone Montana: before
While living and travelling in their RV, the social media-savvy couple are slowly renovating their own motorhome. Their biggest project to date is their fabulous kitchen renovation.
Although being a practical size for a motorhome complete with a kitchen island, the kitchen lacked personality or character. The 'greige' colour scheme throughout was dull and flat.
Budget-friendly Keystone Montana: after
A pale green rain jacket purchased on a trip to Iceland was the colour inspiration for Janae and Tucker's kitchen makeover! The pretty shade was used to paint the kitchen island and lower cabinets.
The above cupboards are painted in pale grey and blend into the kitchen background. The two-tone effect increases the sense of space in the compact zone. A wooden frame and new black handles and fixtures add a layer of farmhouse style to the mix that's modern and fun.
Sponsored Content
Budget-friendly Keystone Montana: after

Janae has packed personality into her RV bedroom by choosing a pillar box red colour theme. A fresh coat of grey and red paint on walls and cabinets plus homemade curtains create a complementary backdrop for the striking red and black check bed linen.
Janea's top tip: peel-and-stick wallpaper is an ideal option if you want to switch up the look without altering the value of the RV. "I decided to go bold with the red accents in my 5th wheel bedroom makeover, and Iove how it turned out!" says Janae.
Budget-friendly Keystone Montana: after
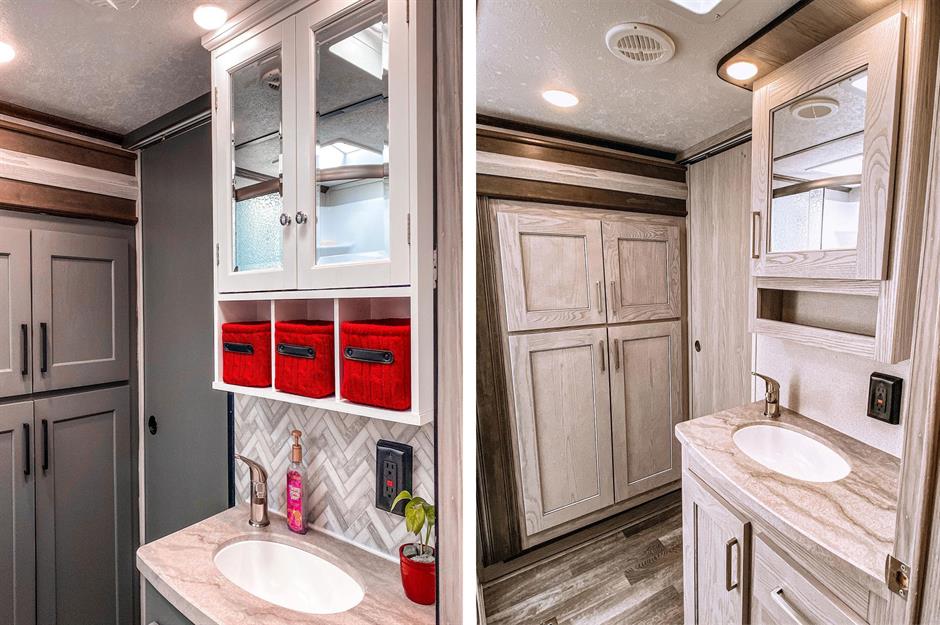
Janae and Tucker's bathroom update proves it's possible to make an RV cosy and homely without having to fork out on drastic renovations.
Shots of personality have been added by painting the cabinets and doors and replacing the medicine cabinet. Red storage baskets and a matching plant pot carry the theme of red through the RV. On her Instagram page Janae says: "We decided to carry the red over from the bedroom and I really like the pops of color in here too!"
Boho-style Jayco Jay Feather: exterior

Kimberly Dekker needed a lightweight tow with a practical floor plan for her family. So, the family bought a Jayco Jay Feather in need of a lot of love.
A living and dining space, bathroom, king bed and twin bunks make life on the road comfortable but the drab décor had to go.
Sponsored Content
Boho-style Jayco Jay Feather: before

This outdated RV is the Dekkers' second camper renovation project. The family learnt a few lessons along the road and put these into practice when renovating their current mobile home.
Hiring a contractor meant new paint and flooring coated and concealed the old existing interior of boring beige and brown in less than a week. The new motorhome interior was then ready for Kimberly to put her boho stamp and fabulous farmhouse decorating ideas onto the space.
Boho-style Jayco Jay Feather: after

Fresh white walls and warm wood floors brighten and lighten the whole space. Leather-look fabric updates the dinette cushions and makes the monochrome fringed accent cushions pop. The rustic breakfast nook is a cool way to squeeze in an eating space.
Prairie-style bedding and a traditional woven runner add layers of cosy yet pared-back texture to the narrow home.
Boho-style Jayco Jay Feather: after
Kimberly proved that all you need is a new lick of paint on cabinetry to totally transform a kitchen. The kitchenette update is now painted Benjamin Moore's Caldwell Green which alternates between an attractive hunter green and regal blue depending on where the RV is stationed and what light is falling onto the surface.
Teamed with black appliances and natural wood storage options, the kitchen looks modern, fresh and new.
Sponsored Content
Boho-style Jayco Jay Feather: after
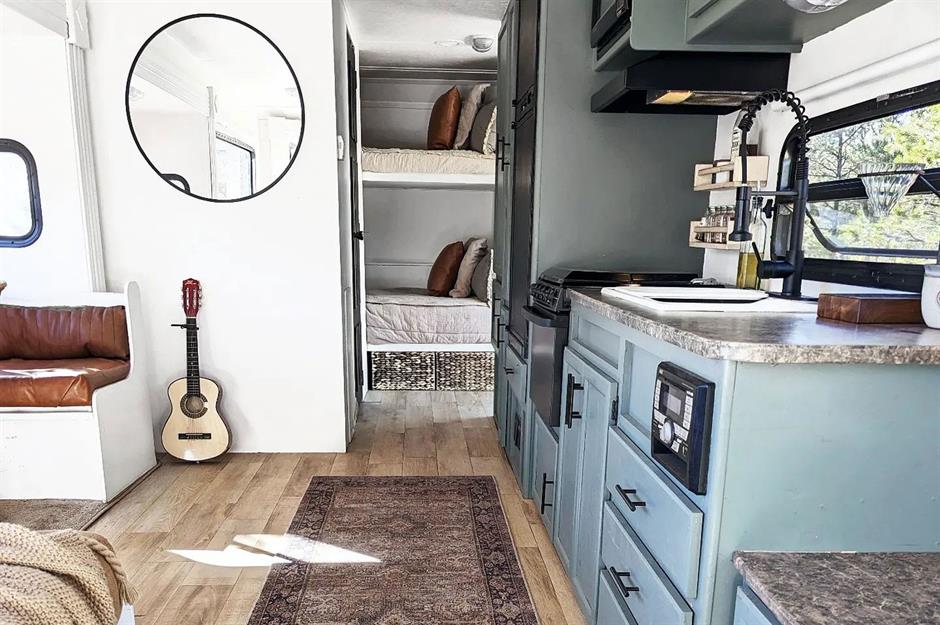
As well as the master bed, Kimberly's separate twin room has been revamped to create a fresh and modern space for her children. Existing built-in bunks remain to optimise the compact space but are now painted white with updated coordinated bedlinen. Baskets for storage fit neatly beneath creating texture and an additional storage solution.
A black-rimmed circular mirror brings the look up-to-date while yet more useful storage baskets made from natural materials give the camper a coherent theme throughout. The initial project cost the family just £1,300 ($1.7k).
Maximalist vintage RV camper: exterior
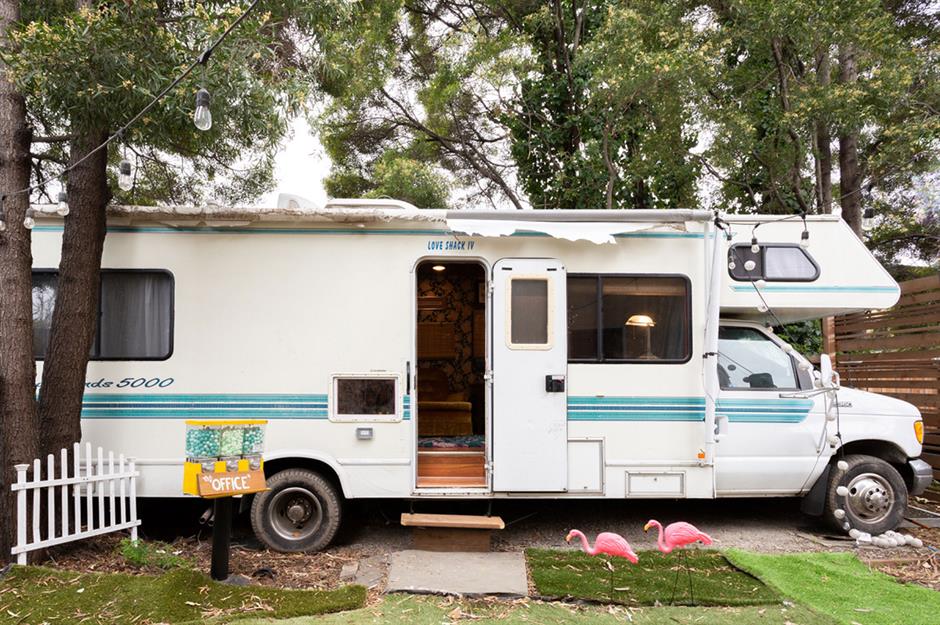
When a vintage RV was left behind by family at Kristen and Phil's co-owned property, the unwanted gift turned into a hidden treasure with the help of Catherine Hooper, owner and founder of iSPY Home Design.
The sad and completely unfurnished four-wheeled capsule was soon transformed into a self-contained communal space for work and pleasure in mid-century Mad Men maximalist-style.
Maximalist vintage RV camper: before
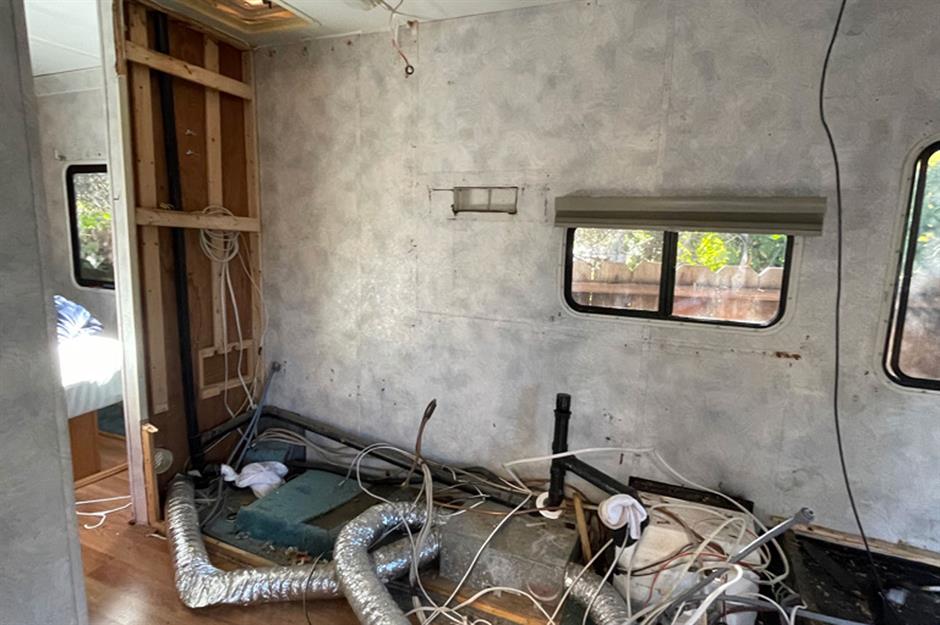
The original interior was dark, cluttered and uncomfortable. However, ripping back the old out-of-date upholstery created a blank canvas full of potential for Catherine to work on work on.
"I'd seen a lot of similarly-renovated campers, but most of them featured the same modern minimalist aesthetic with mostly Southwestern décor," Catherine told Apartment Therapy. "I just felt these clients wanted something different — something more funky and eclectic."
Sponsored Content
Maximalist vintage RV camper: after
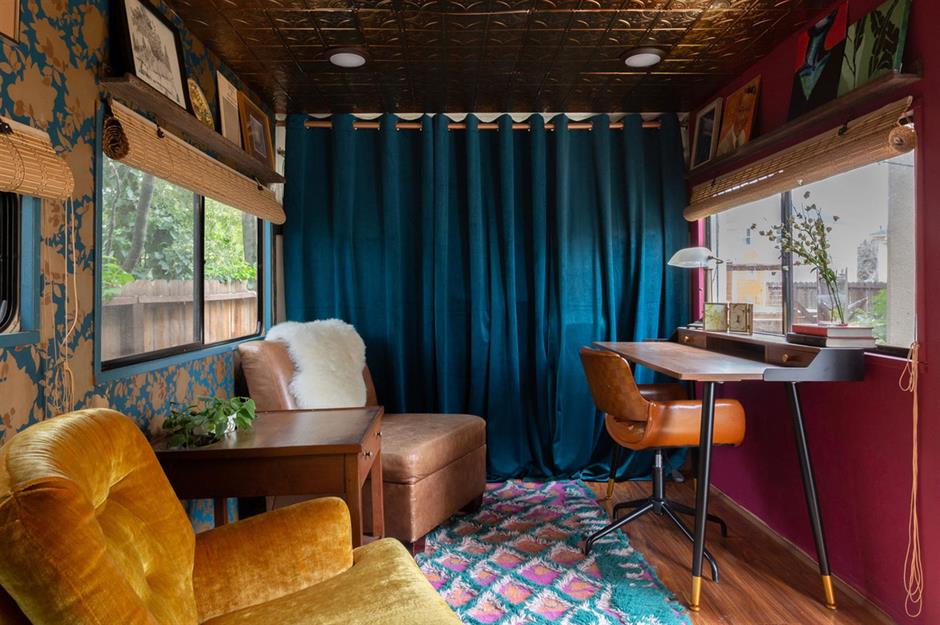
Sourcing mostly second-hand items the main living space has been transformed into a retro-cosy office space and break-out zone. Richly-toned walls teamed with teal and gold silhouette print wallpaper frame the lounge on either side of plush velvet curtains that cleverly hide away the driver's cabin.
The standout statement ceiling, tiled in reflective copper, draws the eye up to offer a luxurious reflective finish that increases the sense of space.
Maximalist vintage RV camper: after

In the bedroom, a cool colour palette of turquoise, white and yellow creates a refreshing and radical change.
You would never guess the fitted storage around the bed is the original, thanks to the aquamarine update and new shiny gold handles.
Maximalist vintage RV camper: after
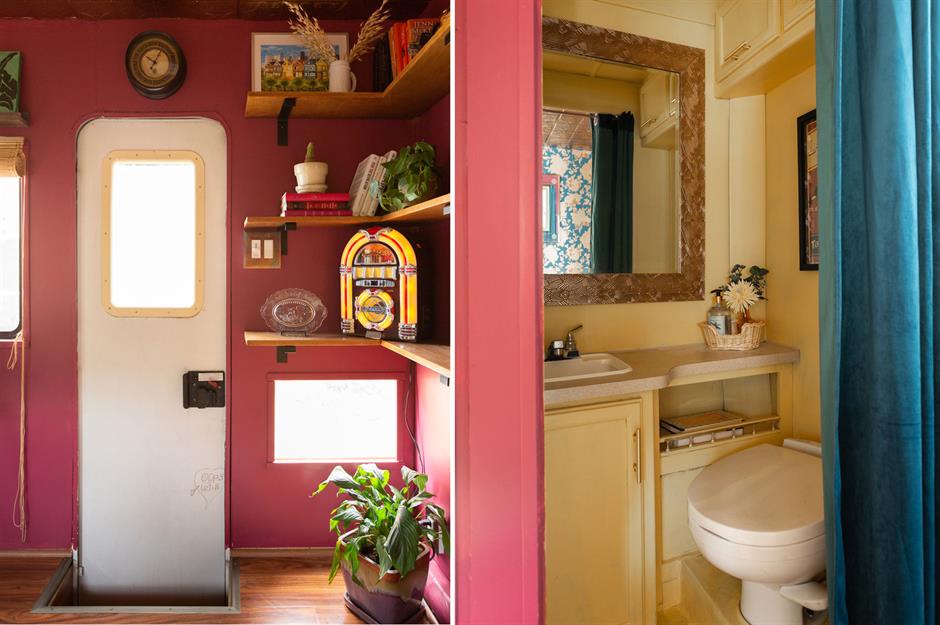
Little extras such as a tiny jukebox and vintage artwork have been carefully chosen to represent the Counterculture Movement of the 60s and 70s that was rife in San Francisco at the time.
The tiny bathroom has been dipped in sunshine and painted top to bottom in bright yellow paint. Even the sink has been upcycled using Rust-Oleum's Tub & Tile paint to make it look brand new and cohesive with the colour-drenched space.
Sponsored Content
Yellow Sprinter van: exterior
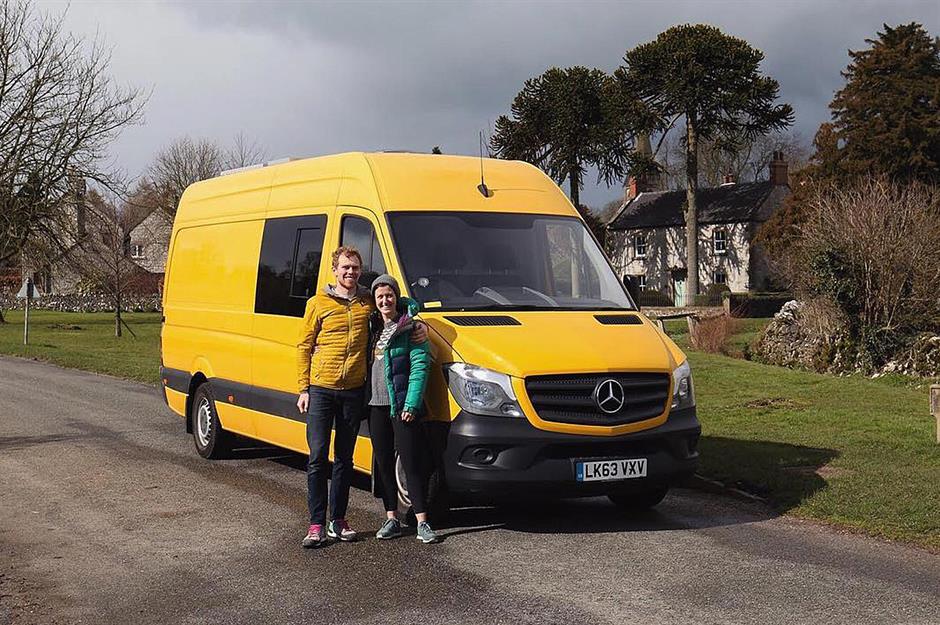
Next up is Ringo, an eye-catching yellow Mercedes Sprinter van bought by climbing enthusiasts Charlie and Dale in 2019. Both van conversion novices, the pair scoured the web for resources before embarking on an extensive project to convert their automobile into a snug home.
The ambitious pair tackled all the plumbing, wiring and insulation themselves, working through the cold, winter months to make the van liveable.
Yellow Sprinter van: before
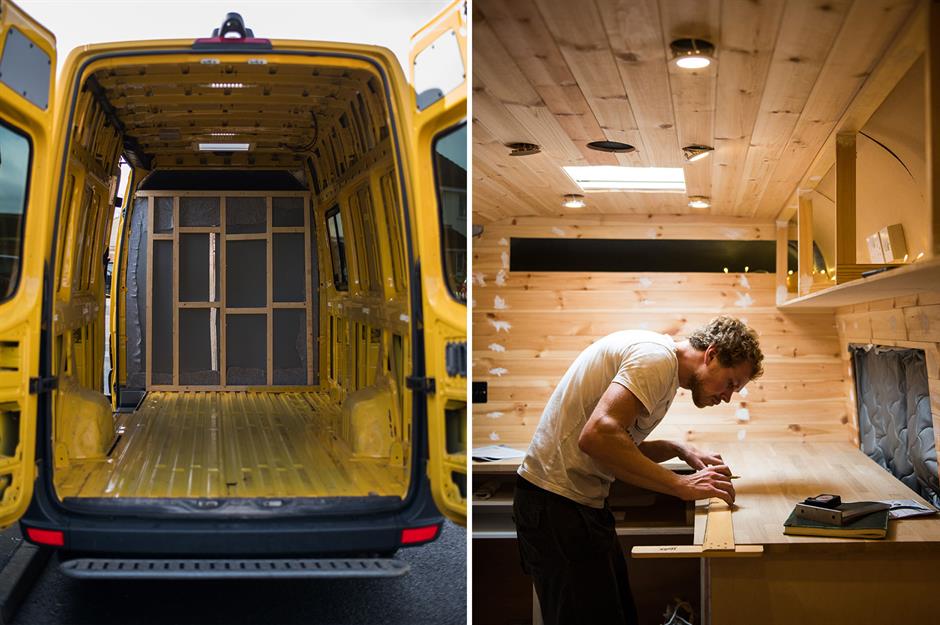
They compiled all of their research, plans and tips into a series of blog posts that can be found on their website.
With the initial construction work complete, they moved onto the arduous process of fitting the kitchen and integrated storage, building the bed and seating and decorating the Sprinter's interior.
Yellow Sprinter van: after
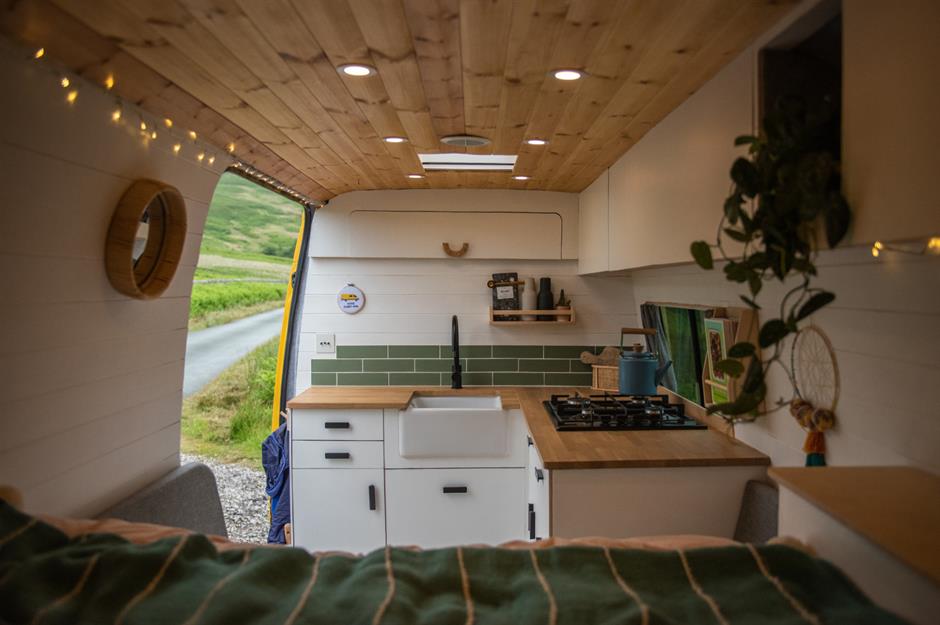
One renovated Sprinter later and they’re free to explore to their heart’s content; travelling and climbing wherever the wind takes them. Inside, the van is sleek and stylish with a neutral palette of cream and forest green complemented by light wood panelling.
The L-shaped kitchen has ample counter space and boasts a four-burner hob and a gorgeous Belfast farmhouse sink. Little shelves with dowelling bars keep everything in place when Ringo is on the move.
Sponsored Content
Yellow Sprinter van: after
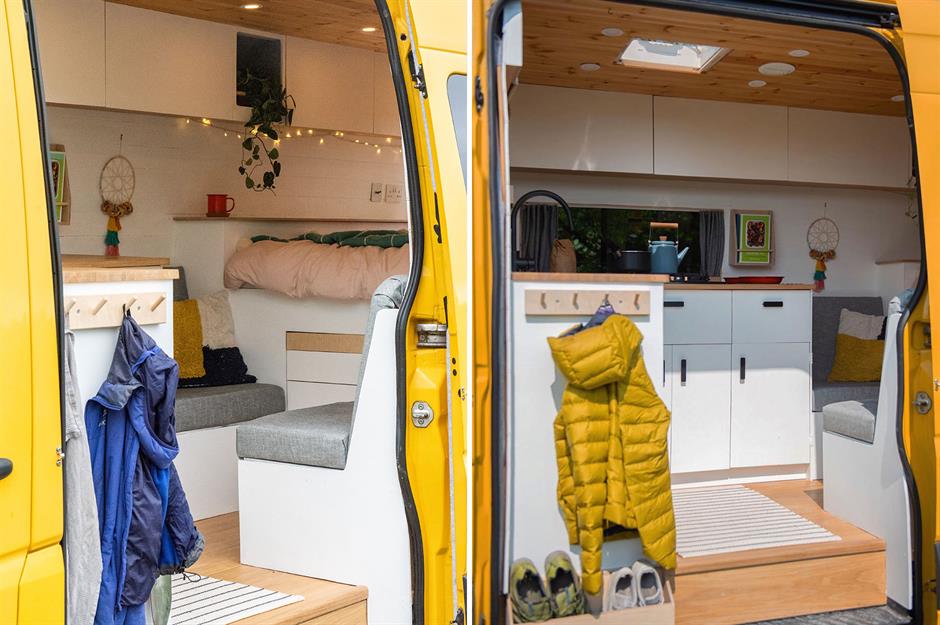
The converted Sprinter van is the poster child for space-efficient design, with every nook and cubby put to good use. The end of the kitchen counter has a shoe rack and pegs for coats, while the bed conceals a slide-out table for mealtimes.
The camper has plenty of smart storage spaces for tiny living, including overhead cupboards, secret drawers and a bookshelf that runs the width of the rear of the vehicle.
Yellow Sprinter van: after
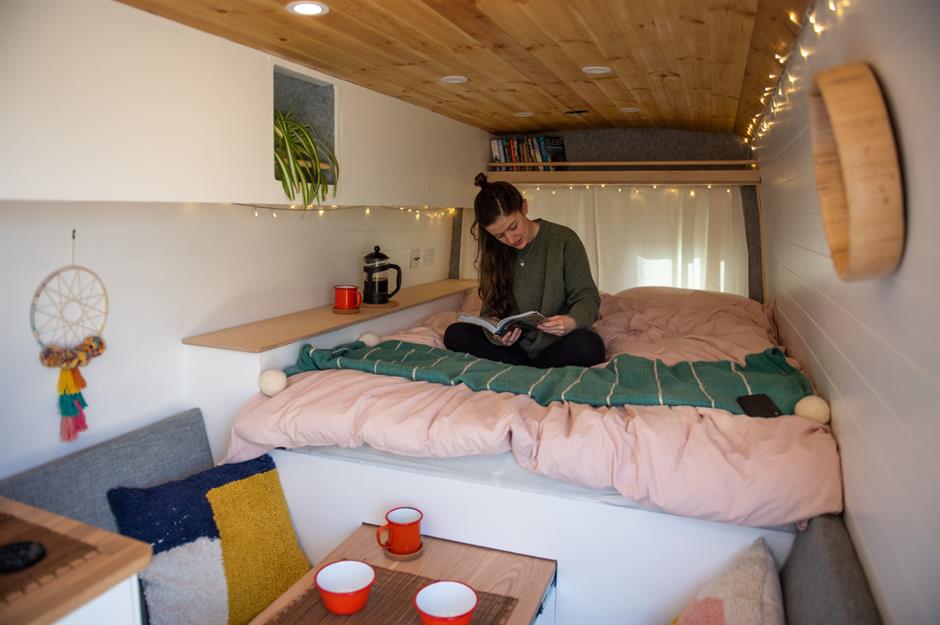
A standard double bed is built into the back of the van, flanked on one side by a shelf that lifts up to reveal yet more storage space. A few trailing pot plants and a string of fairy lights lend the space a homely feel, with bedside light switches and plug sockets a practical addition.
A few colourful throw cushions and a rustic wooden mirror add the finishing touches to this beautifully designed motorhome.
Colourful Dutchman RV: exterior

DIY aficionado Maggie Lott spent months scouring camper listings before she came across the perfect RV for family getaways.
The 2002 Dutchmen Classic had plenty of space to accommodate her four boys and Husky, however, the interior was in dire need of a facelift.
Sponsored Content
Colourful Dutchman RV: before
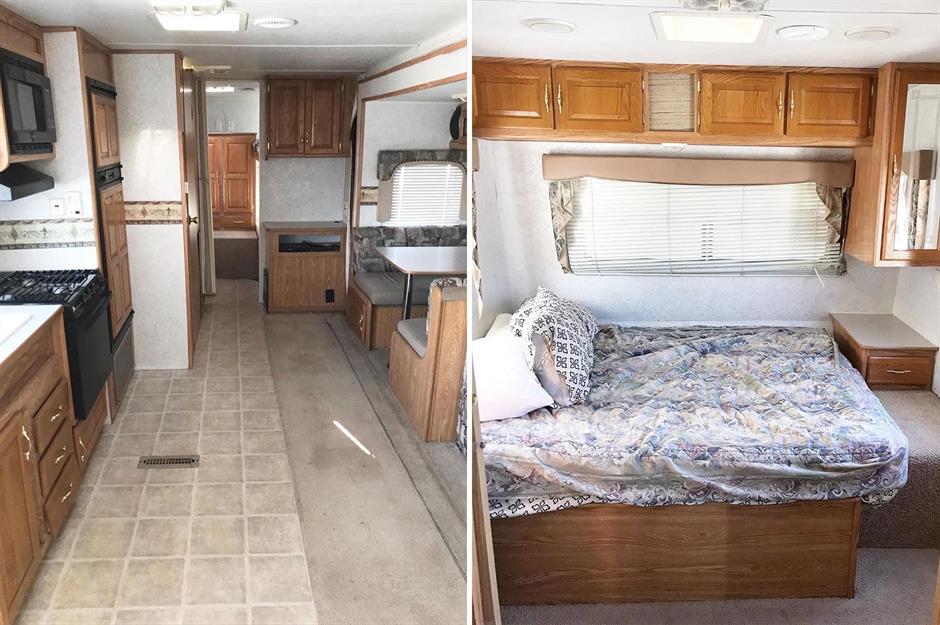
Sharing her progress on her Instagram page, @maggies_makeovers_ had her work cut out transforming the dingy, dated interior into a bright and functional family-friendly space.
Faced with stained carpets, old-fashioned décor and some water damage, the fixtures were stripped out, parts of the interior were reframed and the roof was resealed with a rubber coating. With a structurally sound blank canvas, Maggie could then let her creativity run wild...
Colourful Dutchman RV: after
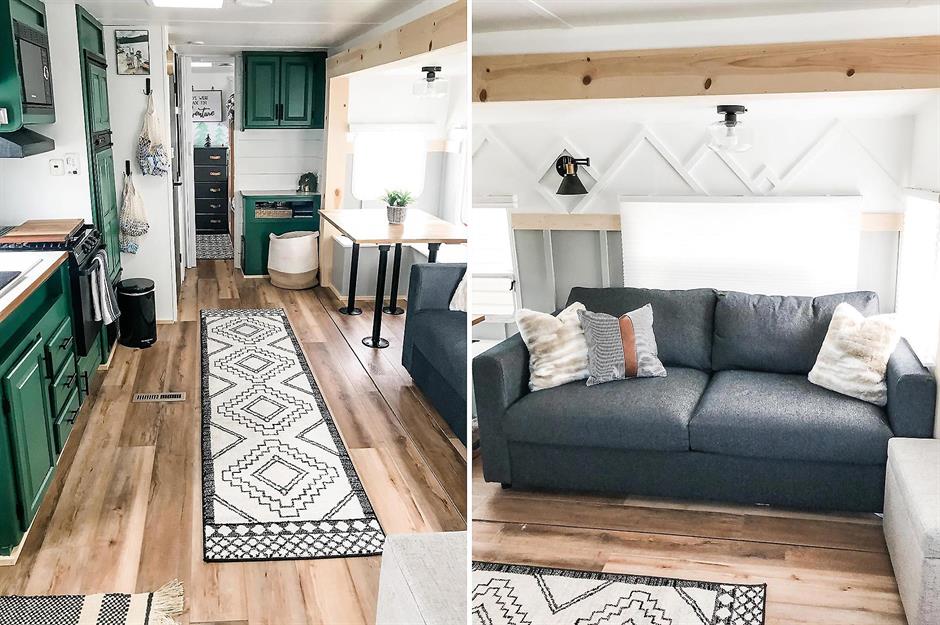
The result is an effortlessly stylish RV that's almost unrecognisable. A lick of rich green paint has breathed new life into the kitchen cabinetry, while a new tap, hardware, microwave and stove backplate updated the amenities for modern living.
White walls and warming wood floors frame the new dining spot and sofa, which pulls out into a queen-sized memory foam bed, ideal for hosting guests.
Colourful Dutchman RV: after
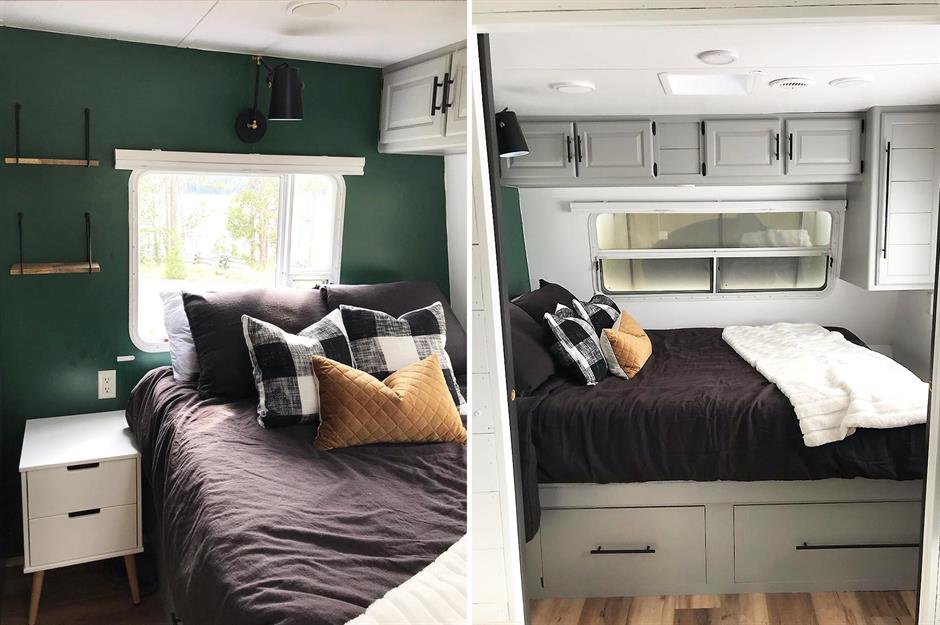
Oozing cosy Scandi style, the updated master bedroom features a forest green feature wall and sliding barn doors for privacy.
The overhead cupboards were given a refresh with calming grey paint, the old bed frame was replaced with a large queen-sized storage bed with vast drawers in the base and space for baskets at the foot of the mattress.
Sponsored Content
Colourful Dutchman RV: after
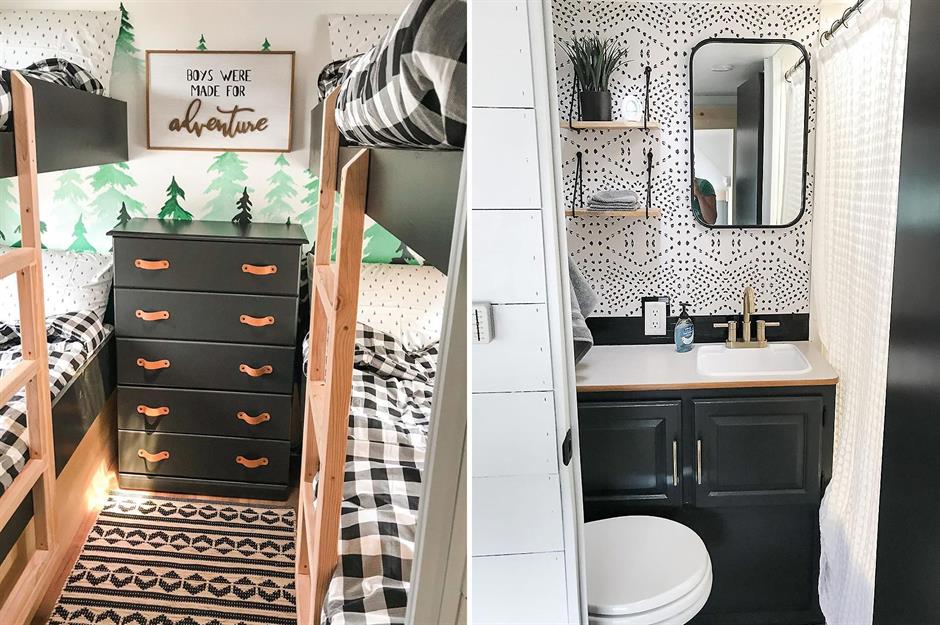
Throughout the motorhome, the attention to detail is second to none. In the bathroom, monochrome patterned wallpaper creates a glamorous feel, while miniature black glass metro tiles, cut by Maggie herself, surround the washbasin.
Our favourite space, however, has to be the bunk room – check out that incredible hand-painted forest wall mural! Wall-mounted wire baskets give the boys plenty of storage space, while shiplap evokes rustic, cabin vibes. Talk about a transformation!
Loved this? Take a look at these incredible tiny homes